
Witkerk Drift, 1899
20th February 2020, 4 Comments
Queen Victoria’s Little Wars, The Men Who Would be Kings, 28mm
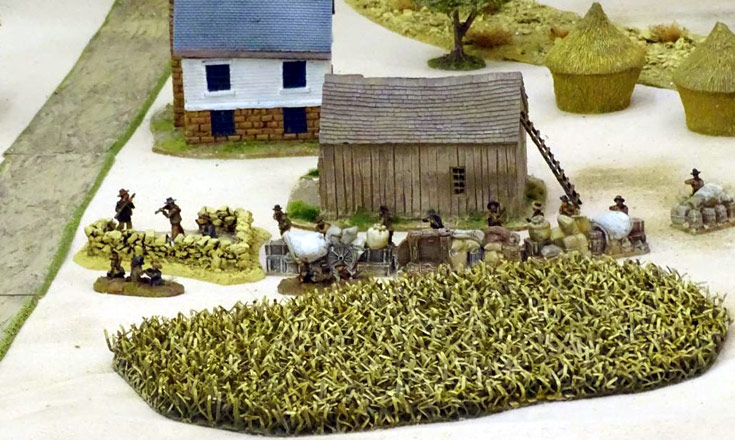
This was an attack and defence game, with the Boers dug in around the hamlet of Witkerk (“White Church”) in the Transvaal. The British appeared out of the veldt to the north. The hamlet lay just north of a ford over the Mizinyathe River. To win, the British needed to seize the ford, so the rest of their column could cross the river unopposed. All the Boers had to do was to hold their ground. In our game, Lindsay and Sean played the steely Brits, with Gyles and Mally took the verdoem Boers. I just ran the game. We played it on a 6×6 foot table, which was fairly open apart from the river, the hamlet and a couple of stretches of dried-up river beds. The British force consisted of two infantry units for each player from the Gordon Highlanders and the King’s Own Yorkshire Light Infantry (KOYLI’s), backed up by a Pom-Pom for Sean and a unit of 8 Lancers for Lindsay.
  The Boers had four units of irregular infantry, all from the Sandwijk Kommando. They were rated as mounted, and sharpshooters, with modern rifles. They also had their own Pom-Pom. Each unit was 12 figures strong. So, this was really a fairly large skirmish game. Some of the Boers were in trenches, while others were manning barricades around the northern perimeter of the hamlet.
  It certainly looked a tough nut to crack. So, the British began advancing cautiously, using what little cover there was to screen them from the Pom-Pom. Rifle range was 24″, so they had a way to go before they had to worry about the dug-in Boer sharpshooters. In TMWWBK, each unit has a leader whose characteristics can influence the game. The British had the worst of the rolling for leaders bit, with their Pom-Pom being commanded by a tardy duffer who spent almost the whole game getting his gun deployed within range of the enemy. Generally, the Boers had better-quality leaders – which is probably as it should be.
 For the most part, the Yorkshire infantry had the easiest approach, covered by an outcrop of rocks, and then by dried-up river bed. We counted this as providing soft cover behind it, but hard cover if you’re in it. However, with the British on the offensive, there was no time for caution. On the right side of the table though, Lindsay’s highlanders and lancers had considerably less cover to hide behind.
 They came under fire, first from the Pom=-Pom, and then from the Boer infantry. Surprisingly, this wasn’t as effective as Gyles and Mally had hoped, but it was enough to pin one unit, and influict several casualties. In the rules as written, pinned units have to stay put. We changed this – they go to ground, making them harder targets, and they get the chance to crawl backwards out of range.
  The other highland unit took a bunch of casualties, but the survivors managed to reach a dried-up river bed on the far left of the Boer position. There the highlanders opened up a harassing fire on the Boer Pom-Pom, which was in a sanger on the left of the Boer line. Meanwhile, Lindsay’s lancers had crossed the table to the left flank, and taken cover in the other dried-up river bed. Sean’s Yorkshire infantry had reached it too, and now everyone was gathering themselves for the final stage of the attack.
  SO far the Boers had done very well. They were outnumbered in terms of points (24 Boers v 36 British), but they’d dished out a fair bit of punishment. The Yorkshiremen had suffered a bit too, and one of their units was pinned in the river bed, delaying the attack. In the end though, this short lull ended when Lindsay decided to launch her lancers out of the river bed in a hell-for-leather charge!
 This was aimed at Gyles’ right-hand unit. It was in a line of trenches, and in TMWWBK there’s no opportunity fire. It was all down to the melee. The lancers won that easily, driving the Boers from the trenches. They then rode down the survivors as they fled towards the back of the church. That though, wasn’t the end of it. The lancers had taken two casualties before their charge, and two more during the melee. That left the small unit at half strength. Normally, that should have made their commander a bit cautious…
 Not Lindsay though, She charged again, this time hitting the next line of Boer trenches, and once again the defenders broke under the pressure. The survivors legged it, and again most of them were ridden down. The survivors then failed their morale test and fled. A third Boer unit behind the barricades also broke after taking just two casualties from the British Pom-Pom, which had finally got itself into action. So, the Boer defences were crumbling fast, and the Yorkshire infantry were now surging forward towards the church.
  That’s pretty much where the game ended. With their one remaining infantry unit pinned, the Boers fell back towards the river and the ford. The Pom-Pom limbered up and went too, leaving Whitkerk in British hands. The game had been fairly slow-paced to start with, but once the shooting started it became fast and furious. The high point though, was the gallant charge of the 5th Lancers! The rules really are just what you want for a club night game – fast-paced, highly enjoyable and filled with flavour. So, I can see us returning to the Transvaal again. Best of all, my gin-bearer (below) survived the action, and never spilled a drop…
fortune favoured the bold that night. My lancers did a cracking job! It was a great game, well worth getting off my sick bed to play. Im looking forward to playing again. Its made me want to paint my Zulu’s next instead of Imperial Japanese
Excellent … I look forward seeing them in all their ebony glory. remember too, your Zulus can fight the Boers and other African tribes as well as Michael Caine…
Great stuff Angus! Just starting out with this using my old 15mm kit. I am unsure about the Boer ratings still. Not sure after reading a lot that sharpshooters are correct. Some interesting stuff on the TMWWBK FB Group. In your experience do the rules as written work well? Pity the author didn’t do a second Boer war list.
Yes, “sharpshooter” made them a little too effective. “Mounted infantry” is appropriate, but their automatic action needs to be Fire rather than Move. The rules do the job quite nicely though, and above all they give an enjoyable game which feels about right.