
The Ponte Trave, Fano, 1944
10th May 2018, 0 Comments
The Second World War, Chain of Command, 28mm
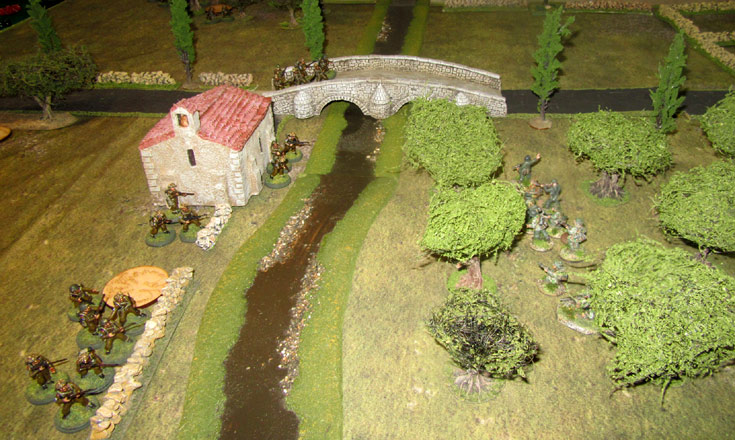
With other regulars bailing out to play other games, it was left to Bart and I to stage a game. We decided on a Second World War skirmish – something we hadn’t done for a while. Usually, Bart fields the Polish Armoured Division in Normandy, but this time round we decided to change venues, if not nationalities, and set the game in Italy. To be more specific it was based on the Polish II Corps’ attack in Operation Olive, the drive up the coast towards Pesaro in August-September 1944. The Polish 3rd Carpathian Rifle Division was probing northwards from Fano in the region of the Ponte Trave, where the N45 road crossed the Arzilla stream. Facing them were the German 278th Infantry Division.  This was an attack-defend scenario, with the Poles attacking northwards up the 6×4 foot table. The Germans started around the southern outskirts of the scattered hamlet of Belgatto (18″) onto the table), while the Polish “jump-off points” started on the table edge. Bart and I played through the “Patrol phase”, and by its end we were pretty much lined up on opposite banks of the Arzilla. Then we kicked off, with Bart going first, as he was the attacker.
  He deployed two of his sections pretty much straight away, one on the Fornace Chapel, on his side of the stream, and the other in an olive grove a few hundred yards to the west (his left). I did the same, with my first two squads going in the olive grove facing the stream near the chapel, and in and around a big white house (la grande casa bianca) dominating the western side of the table, and therefore my right flank. His tank also trundled on, a Sherman from the 2nd (Warsaw) Armoured Brigade. Bart used up all his seven support points on this puppy, while my 3 points were blown on an adjutant (to ease my deployment onto the table) and a spare panzerschreck team.
  First blood went to me. Visibility through the olive groves was 4″, and Bart rashly moved his 2-inch mortar team up to the edge, ready to lay smoke around the big white house. Instead they got spotted and shot up by my squad’s MG34. Then came two double moves for me, thanks to rolling sixes in my command dice. On the second one I actually rolled three sixes, which ended the turn, meaning his broken survivor from the mortar team was removed from play. That brought Bart’s force morale down to 6 – mine stayed put at 9. What followed was a couple of straight-up firefights.
 On the Polish left, Bart’s 1st section deployed in the olive grove and began shooting up the Germans in the big white house. Meanwhile, on Bart’s left near the Ponte Trave, his 2nd section began a firefight with my Germans in their own olive grove, on the far side of the stream. In the first fight I was in hard cover, and Bart in soft, while this was reversed in the fight near the bridge, as Bart had a stone wall to hide behind, at the back of the chapel.
  Strangely, the side with the better cover got the worst of the firefight. In the casa bianca my Germans got badly shot up – Bart kept rolling sixes, and while I caused a few casualties, my squad was getting rapidly whittled down. Over by the chapel and the bridge it was the other way round. i got a lot of hits, but my lieutenant rallied these off, allowing my German squad to fire back with gusto. This time they got the better of the exchange, and it was the Poles who suffered mounting casualties. Bart responded by deploying his third section at his “jump off point” near the chapel, and while his Bren team covered them from the chapel window, the riflemen began a cautious advance across the bridge.
 To back them up Bart moved his tank forward, and suddenly things didn’t look so rosy for me. I still had a squad in reserve – I hadn’t deployed it yet – but my squad in the olive grove looked a little out on a limb. The other trick up my sleeve were my two panzerschreck teams, but I was holding off deploying them too, until his tank got closer.
  My big hope was to whittle down one of his three sections, forcing another drop in morale. So, I kept shooting up his 2nd section, hiding behind the stone wall bear the chapel. They got pinned, which meant their firepower dropped a bit, and thewy would have broken, having suffered a few casualties by now. however, the Polish lieutenant hiding behind the chapel kept rallying off hits, so they stayed in the game. then came a devastating burst from my MG34, boosted by my lieutenant to a whopping 10 dice. I scored three kills, which effectively wiped out the squad, and their section leader. That dropped Bart’s morale down to just 4.
  Both my front-line squads were down to two men and a dog, but thanks to some nifty hit removals they stayed in the game. Things started to look dodgy when his Sherman moved up to the south side of the bridge and started firing HE into the casa bianca. Amazingly though, it didn’t hurt anyone, and the firefight over there continued. then – glory of glories – my defenders – or rather their MG34 team, as that was pretty much all that was left – whacked a bunch of hits into the Poles in the orchard. they’d already taken quite a few casualties, and this forced them to break.
 Bart rolled to see if his section leader was hit – he was – which prompted a couple of rolls on the force morale table. His particularly unlucky roll dropped the Polish force morale down to 0, and so ended the game. So, it was a German victory, won through firepower rather than manoeuvre, and more than a little luck. It was a good little game though, and we both enjoyed it. Bart though, confessed afterwards that the early loss of his 2-inch mortar team scuppered his whole plan, as without smoke he wasn’t able to attack without risking unacceptable casualties. Next time, he might want to spend his points on more baby mortars then, rather than a pretty useless Sherman!