
The Merano Ambush, 1524
31st August 2017, 5 Comments
The Italian Wars, Pike & Shotte, 28mm
For weeks, German Michael (aka “Mad Micha”) has been wanting to run a Renaissance game. He loves them, especially if they involve lots of landsknechts. He normally prefers a battle fought on a flat and featureless plain, but this time I talked him into doing something a bit different. Right, let’s set the scene. It’s late 1524, and an Imperialist force was marching south through the Brenner Pass, on its way to join the main Imperialist army at Cremona before the snows blocked the road. These troops weren’t just there for the fun of it – they were also escorting the Emperor’s siege train.  The Venetians, as allies of the French, were out to stop them. They were lurking in ambush some miles south of the pass, near the village of Merano. That was where the narrow pass opened out into a wider valley, that then ran south to the town of Bolzano. So, when the Imperialist force began debouching from the pass, the Venetian commander game the signal, and his small army stepped out of hiding and began their attack.
 The map shows the set-up, and the Venetian options. The game was played on an 8×6 foot table. I had the option of deploying on either side of the valley, so I opted for the eastern side, as in theory that was the direction of my line of retreat if things went wrong. I have to say, I love my Venetians, but they don’t have a particularly good track record on the tabletop. So, a line of retreat is important! While the Venetians were mine, Michael provided the Imperialist opposition. My Romagnol infantry battle was massed on the hill to the left of the Imperialists, at the top of the map above, while the Tyrolean mercenary one was just below it, on the valley floor. To its left was my main cavalry force led by my army commander, Bartolomeo d’Alviano, while my smaller cavalry reserve waited on the hill behind the Tyroleans. That’s Bartolomeo down below.
 The battle began when my guns opened up. I couldn’t get at Michael’s left-hand pike block, so I targeted the doppelsoldner unit in front of them. This seemed to work, as when they became disordered the pikes couldn’t move, as they were trapped behind them. So, first strike to the Venetians. My two guns kept up their fire throughout the game, and caused a fair bit of disruption in the Imperialist ranks. By now though, things were hotting up. Michael send forward his screen of arquebusiers, to pin me down while his mikes moved in for the kill. That at least, was the plan.
 Strangely, his main block of cavalry didn’t move for the first three turns. it tuened out he kept failing his command rolls. His advanced guard force of lighter cavalry pulled back to the western side of the valley though, and screened my horsemen, who seemed quite content to sit tight for the moment. Back on the Venetian right the Imperialists did the unexpected, as their arquebusiers charged my ones. Both of us had pike blocks in the vicinity, but this “battle of the skirmishers” needed to play out before they got to grips.In the end, after two rounds of combat it was the landsknecht shot troops who were forced to retire. Then, a few rounds more of roundshot forced a break test on them, and they evaporated.
  Michael wasn’t done with his sneaky little attacks though. A unit of sword & bucklermen and that unit of doppelsoldner did the same, along with the rest of his arquebusiers. This time the two-handed swordsmen picked the wrong target. They tried to attack one of my guns, but its closing fire stopped them in their tracks. then, supporting fire from my militia crossbowmen saw the German s break and run.
 Next up were his second unit of landsknecht arquebusiers, who evaporated too when faced with the fire of my Venetian guns and skirmishers. I was clearly winning the firepower battle – as all Michael had left to shoot with by this stage were his two little guns. Actually, I don’yt think they actually scored a hit throughout the game.
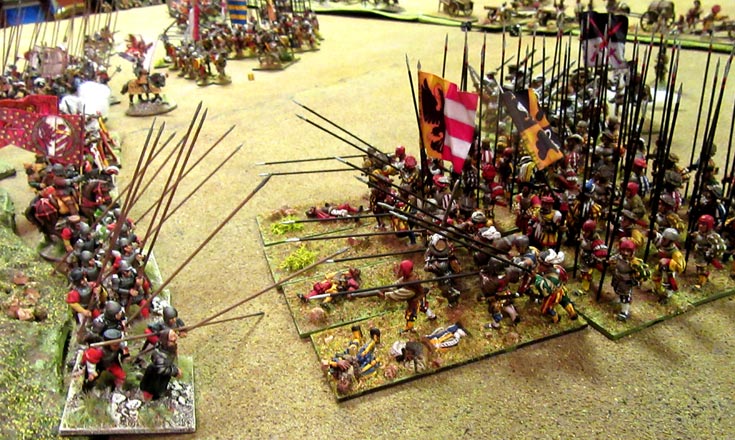
  Far more successful though, were the landsknecht sword & buckelrmen. Now, before the game we’d been debating how best to rate these little units – the ones designed to swing out from behind a pike block and chop up their opponents. We both had them – my rodolieri were designed to do the same thing. So, by way of an experiment, Michael gave some a hand-to-hand rating of “3”, and others a rating of “6”. So, when his bucklermen charged my Tyrolean pike block I almost laughed it off, right up until the dice started rolling. We both had 6 melee dice, and the result was a draw. He then had a bonus for his swordsmanship, and I landed up retiring. Those little bucklermen had thrown back a whole pike block! They weren’t such a joke unit as I thought!
  Back on the cavalry wing Michael’s horse had finally begun to move up, and growing tired of waiting I threw my Venetian cavalry forward in an all-out charge, hoping to smack the opposition before this new batch of German men-at-arms reached the front line. This charge was generally successful – I routed a unit of stradioti in Imperial service, and a unit of Imperial men-at-arms. That though, left my own elementi (men-at-arms) shaken and vulnerable. However, when a second unit of Imperial mounted crossbowmen were forced to retreat I found there was nothing left between my stradiots and the enemy siege train.
  That, unfortunately, was the point where we ended the game, as we were out of time. The two sides hadn’t really done much with their pikes, safe for a last turn push by both sides on the German left and Venetian right. My Romagnol pikemen held their landsknecht opponents to a draw. In the centre my Tyroleans had sorted themselves out again, and were awaiting the advance of the second landsknecht block, after those pesky sword and bucklermen had been forced back through arquebus fire.
  So, the game ended with the Imperialist siege train no further than halfway up the table, and with nothing between it and the Venetian light cavalry. The Venetians had won the first round of the cavalry fight, and so outnumbered their Imperialist opponents, even though the German horse were fresh, and their men-at-arms were still there, waiting to strike. In the end though, having lost five units, Michael conceded defeat. We both thought it was a great little game, and our experiment with the little supporting units was an interesting one. Pike & Shotte don’t really deal with them properly, so our plan is to give these small blocks of assault troops a rating of “4” next time, to see how that works. The best thing though, was that the game – as ever – was a real visual treat.
Looks great Angus.
Yes Paul, it’s a very pretty period. I quite like the rock, scissors and paper aspect of the units and tactics too, even if I usually choose the wrong one!
Cool battle, I love that era, always wanted to paint up forces for the French Wars of Religion but too many projects not enough time.
Your armies look wonderful, so much color!
Your battles of this period look superb Angus. Very inspiring and I really shouldn’t get into it as my ECW collection has only taken me since 1987 to where I am now with a few brigades a side!
I guess I could get a unit or two perhaps to start with…long slippery slope begins…!
Thanks Jason. A few brigades a side is enough for a good ECW game. I’m looking forward to the release of For King & Parliament, the ECW version of the Ancient rules To the Strongest. They might be just what you’re looking for to re-boot your enthusiasm for the “War without an Enemy”.