
The Bridge over the Taglia, 1758
3rd June 2013, 0 Comments
The Seven Years War, Black Powder, 28mm
The Sunday before this game was due to be played I thought I’d better come up with a scenario. I’d already planned to stage a small Seven Years War clash, but rather than a straightforward “line ’em up and fight” game I wanted something slightly more interesting. I began leafing through old copies of Battlegames, looking for a suitable Charles S. Grant Table Top Teaser. I found it, but then I began thinking through the forces I had. I was short of Allied cavalry, and it would work much better if I was able to peel off some Reichsarmee units from my French army, and give them to Prussia’s Allies. Just for a change, as this was a non-historical game, I set it in Lombardy, in Northern Italy.  The game is based on an old tabletop teaser, the first ever published by Charles, which appeared in Battle for Wargamers magazine in 1978. It was republished in Charles’ Table Top Teasers, a special edition produced by Battlegames magazine in 2008. This first ever Teaser was a bridge demolition affair, and seemed a good place to start off the new venture. The idea was, in 1758 an Allied column entered the contested territory of the Bishopric of Spritz. A larger French force was sent into Spritz to drive them off, forcing the Allies to retire towards the border, delineated by the River Taglia. Colonel von Mayrhofen commanding the small Allied force withdrew to the small border village of Montecello, where he ordered his engineers to prepare the bridge there for demolition. However, the hard-riding French cavalry were already massing in the hills above the village, and so von Mayrhofen was forced to deploy his troops in defence of the bridge, buying time for his engineers to complete their work.
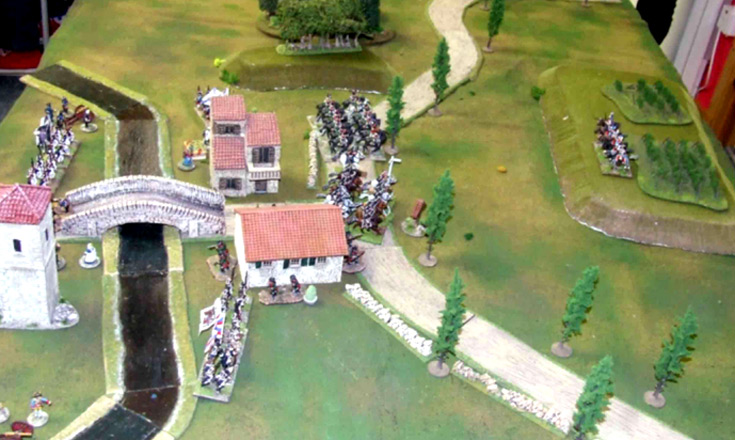
  Charles Senior’s original map can be seen above, along with a photo of the starting positions. The French (played by me) were “Red”, while Chris Werb’s Allies were “Blue”. Apart from some light cavalry piquets the French army was divided into eight groups, and a note of each of these elements was stuffed into an unmarked envelope. Before the game Chris rolled two dice per envelope – one to determine where the force came on (at “A” or “B”) and the other to see what turn they arrived on the table.
 The game began with the arrival of the French guns and light troops. The advancing chasseurs a pied were driven back by an Allied cavalry charge, but soon close-range fire from the artillery and the skirmishers forced the cavalry back to their starting positions. Apart from a similar charge to drive back the French piquets. Mayrhofen’s cavalry remained in position in front of the village for most of the game, suffering casualties but standing firm. After all, their job was to buy time for the engineers. By turn 3 Chris’ infantry had started coming on, but his attempt to combine his scattered cavalry on Vineyard Hill proved problematic. He failed every Command Roll for them for six turns in a row! Of course it didn’t help that we rolled up the abilities of the two commanders before the game, and his one – Count Louis de Grenache – was rated as slightly under par, with a Command Rating of 7. That effectively meant he needed a seven or less on two dice to activate his units. More times than not the hapless Allies refused to move.
 His artillery could fire though, and began causing casualties among the French cavalry. By then the French hordes were closing in – more infantry was appearing at both “A” and “B”, and were advancing to the east and west of the village. Meanwhile the French chasseurs were peppering away at the enemy cavalry, whose resilience was notable – largely thanks to some nifty saving rolls. The infantry advance to the east of Montecello was slowed by Allied artillery firing from across the River Taglia, but gradually they worked their way closer to the village, engaging an Allied battalion deployed to the east of the buildings as it did so. The French infantry was fired at in turn by Allied Hessian jaegers, ensconced in the building to the north-east of the bridge, on the Spritz side of the river.
 French infantry arrived at “A”, and a general but very cautious advance began, with the first wave of French infantry lining the hills to the north-west of Montecello. Despite supporting fire from another Allied battery across the river the casualties to the Allied British light dragoons reached critical point, especially as they were also being canistered by artillery. The light dragoons broke and ran, leaving a big hole in the defender’s line.The battle was now reaching a critical stage. the Allied battalion to the east of the bridge was forced to retire, and it withdrew back over the bridge to the southern or Allied side of the river. The remaining regiment of Allied cavalry – the Prussian Black Hussars – withdrew across the bridge, and deployed ready to launch a counter-charge if required. To plug the gap the second Allied Hessian battalion on the north bank moved into the building to the side of the bridge – so both buildings were now garrisoned by Allied troops. The Allied reserve infantry battalion and the two guns then deployed to cover the approaches of the bridge, and support the troops ensconced in the buildings on the far bank.
 By now the French were scenting blood, and while an infantry battalion tried to charge the first building held by the Hessian jaegers, a regiment of French cavalry – the Bercheny Hussars – charged hell-for-leather towards the bridge. they clattered through the village and reached the bridge, occupied by that disordered battalion of Allied infantry that had been forced to retire. Despite being in column, and disordered, and rolling a fraction of the melee dice of the cavalry, the Allies inflicted one casualty on the riders, and amazingly suffered no casualties themselves. The cavalry bounced, and retired back out of the village. Similarly the assault on the north-eastern building also failed, as the jaegers held their positions.
 At that key moment the engineers announced that the bridge was ready for demolition. The army was saved – all I had to do was to extricate my two units garrisoning the village, and victory would be mine. At that moment of course we ran out of time. However, the French commander admitted that his infantry were either disordered and needed to rally, or were still a few turns from the bridge. Having failed in their dashing assault, the French cavalry were also in no real position to intervene. We therefore declared the game a tactical Allied victory – helped to a large extent by some appalling die rolls from the French. Next time though, things will no doubt be very different! The defenders suffered more casualties – the breaking of their light dragoon regiment – but they achieved their victory conditions. The game was great fun to play – although it proved a frustrating evening for Chris, given his odds-defying die rolling. Still, it was a fast-paced and highly enjoyable little game. Thanks, Charles, for concocting the scenario.