
The Battle of Weitzel’s Mill, 1781
8th September 2017, 3 Comments
The American War of Independence, Black Powder, 28mm
This week we were off to the Carolinas, to refight the skirmish that preceded the Battle of Guilford Courthouse. The tactical situation is covered in my Osprey on Guilford Courthouse 1781, so I’ll be brief here. Essentially, Colonel Tarleton and his advance guard had been probing for the rebels, and he found them near Reedy Ford Creek, about 18 miles east of Guilford Courthouse. They were there to screen the assembly of General Greene’s rebel army, but when Tarleton approached they began retiring towards the creek and safety. True to form, Tarleton launched an attack, spearheaded by his four regiments of British and Hessian regulars. That’s where our game begins – as the Americans shake out a defensive line to the north of the creek, and Tarleton deploys for the attack. The map below (looted from my Osprey) shows the basic set-up. We changed things a little though, to conform to our stock of terrain.  In this fight, Bill and Campbell played the Americans, while Bart and Ken commanded the British. In theory I was commanding the British reserves – Leslie’s brigade, but in fact I just acted as a sort of scenario-meister. I would have said umpire, but Bill knows the rules backwards, so so he’s the go-to guy for Black Powder queries. Anyway, in this game we played it out on an 8×6 foot table, with the British coming on on the short edge to the south. For once we were using full-scale moves for Black Powder, rather than the 2/3rds ones we normally opt for. victory was simple. The Americans had to stop the British getting a brigade or more off the northern table edge. The British had 12 turns to pull it off.
  The Americans deployed along the reedy Run Creek, facing south. On its southern edge though was the rearguard – two skirmish units of Virginia riflemen. Their priority was obviously to high-tail it over the creek and their own lines. This almost ended in disaster. The British won the initiative on the first turn, and Bart – or rather his alter ego Banastre Tarleton – launched the British Legion cavalry in a charge against one of the two units, which was running back to the West Ford.
 That’s the militia, standing forlornly to the north of the creek, with the cavalry heading down the road towards them. Bill opted to stand and fight, and amazingly his skirmishers drove back the cavalry, thanks to some unusually bad die rolling by Bart. Rather than head over the creek, like the other rifle was doing over by the East Ford, Bill opted to advance into the woods to the south-west – his plan was to use the unit to delay the British even longer.
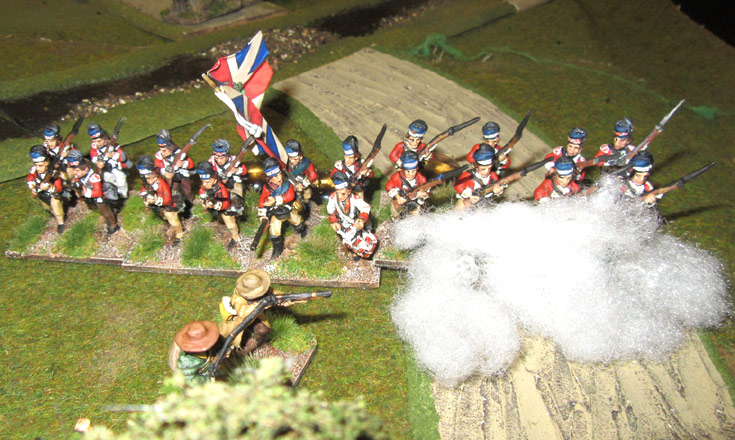
 Campbell’s unit over to the west made it over safely, but then it was duly ordered back across the creek again, to delay the advance of the British there. This it did heroically, firing at the light infantry companies of the Guards Brigade, who eventually lost patience and charged the American riflemen. The melee continued for another turn, with the tide of battle swinging back and fore. In the end both sides had to make a simultaneous break test, and both failed. So, the riflemen went, but so did the best British unit on the table!
  By now things were hotting up by the East Ford. Tarleton rallied his cavalry, and while he sent the jaegers to take out Bill’s riflemen skulking in the woods, he led the British Legion full-pelt at the ford. The attached Legion infantry simply stood to the side and skirmished, but the cavalry splashed across the ford and straight into the waiting unit of North Carolina militia. Again the dice gods were with Bill. He disordered the cavalry with his closing fire, and then comprehensively won the melee. The result was that the British Legion cavalry routed from the field, temporarily taking their commander with them. A sheepish Tarleton returned the next turn, with a slightly lower Command Rating to reflect his chagrin. His men kept running.
 In the centre the 33rd Foot – a large unit operating in two divisions – took on the American militia guarding the big bend in the creek, by the schoolhouse. They aced it in the firefight that followed, helped by the arrival of a 3-pounder battery, which deployed in canister range of the rebels. The shaken and disordered militia duly broke and ran, and the 33rd crossed the Middle Ford. Actually, in the real battle there was a bridge there, but I couldn’t find a suitable one in the terrain store.
 .By now it was Turn 4, and the British reinforcements – Leslie’s brigade – were marching up the table. They elected to head for the West Ford, giving Bart some much-needed extra firepower. His jaegers were already skirmishing with those riflemen in the woods, and the British legion infantry doing the same with American riflemen across the creek. So, this fresh brigade – the 71st Highlanders and Von Bose’s Hessians was just what Bart needed to resume his stalled attack.
  It was the Highlanders who led the way, and after a brief exchange of fire they charged across the ford at the North Carolina militia. This time there was no lucky dice god to help Bill, and the militia were comprehensively routed after missing with their closing fire, and suffering a bunch of melee hits. So, now the British had control of two of the three fords, and were across the creek.
  By now the Americans were down to two rifle skirmish units, one unit of Continental regulars, and Colonel Washington’s cavalry brigade. That tally included the unit still skirmishing in the woods to the south of the West Ford. In fact they and the jaegers spent the rest of the game trading blows, without anyone coming out on top. This though, was an expensive diversion for Bill – it tied up a skirmish unit from each side, but he was outnumbered, and those riflemen might have been more useful north of the creek.
  So, with just the Continental Light Battalion left covering the East Ford, and the remaining unpinned rifle unit in the woods near the West Ford, the Americans were almost out of units. Worse still, the British were now streaming over Middle Ford. However, Bill and Campbell had an ace still to play. Waiting in reserve was Washington’s cavalry – his own 1/3rd Continental Dragoons, McCall’s Militia Horse (a small unit), and another small outfit – Lee’s Legion, which comprised both horse and foot skirmishers (pictured above). It wasn’t much to stop the British, but it was all they had. It was now turn 7. So, the Americans had to delay the British for five more turns to win the game.
  It was time for a cavalry charge. The Continental Dragoons surged forward, smacking straight into the waiting lead division of the 33rd Foot. The two sides clashed just beside the schoolhouse, with the British troops’ backs to the Middle Ford. The cavalry won the first round, but the British rolled well, and didn’t retire. Then, in the next round, the cavalry were driven off.
  Next, Bill tried with Lee’s Legion. They too were forced back, shaken and disordered. Worse was to come though. While all this had been going on the 23rd Foot had been trading shots with the Continental Light Battalion across the creek. Eventually the British fire proved the more telling, and Campbell failed his Break Test. The Continentals skedaddled, which meant that the British now had control of all three fords. The Continental Dragoons rallied and charged again, this time into the 23rd Foot. This time they were dispersed by the British closing fire. General Greene, who by now had ridden up to see what was happening, was now running out of units – and options.
 . Back on the East Ford, Bart used his British Legion skirmishers to screen the American riflemen, while the rest of his brigade force-marched up the road, heading towards the northern table edge. Actually, what he did was to give two units a “follow me” order, one being led by Leslie, the other by the British CinC himself, Lord Cornwallis. These units were the two wings of Von Bose’s Hessian regiment. the Highlanders stayed near the ford, to screen their advance, and to add their weight to the firefight involving the American riflemen. Bill (aka General Greene) had one chance to stop them – his Militia Horse. Cornwallis merely wheeled his unit round, fired a wvolley, and the disordered and shaken cavalry never even came close to launching a charge.
 That, effectively, was the end of the game. The road was clear to the north, and the British had three turns to get there. Game over. General Greene quit the field, escorted by the Militia Cavalry (below). Bill and Campbell had done well, but not well enough.The high points for them were breaking the British Legion Cavalry, and the Guards Light Infantry. The British had superior numbers, and once the reserves came up, that really began to tell. Everyone enjoyed the game though – in fact it was a real cracker – and could have gone either way. Weitzel’s Mill poses tactical problems for both sides, especially for the Americans, who really have to make the most of very little to win the game. Bill and I both liked the added dynamic of using full-scale movement, but if we run this again we’ll ask the British to do it in 10 turns, not 12, to give the Americans more of a fighting chance.
A fine display of 18th century drama and musketry, thanks for sharing.
Will H.
Another splendid battle Angus! AWI battles always seem to have lots of colour and rapid drama on the wargames table. This is a scenario which I haven’t yet tried but should have most of the units for as I have been building up my armies for Guilford Courthouse using your Osprey book as a guide. My table is 8 x 4 and I use 50% movement so I’ll need to have think on the number of turns in the game.
We ran this very scenario a couple months ago. The Brits rolled Yanks in about 8 turns without breaking a sweat. Leslie’s 71st with von Bose in tow taking honors smashing Howard and Campbell on the hills north of the schoolhouse. Awesome command and hand to hand combat rolls. We really like Black Powder in this era.