
The Battle of Trafalgar, 1805
23rd October 2016, 1 Comment
The Age of Fighting Sail, Kiss Me Hardy, 1/1200 scale
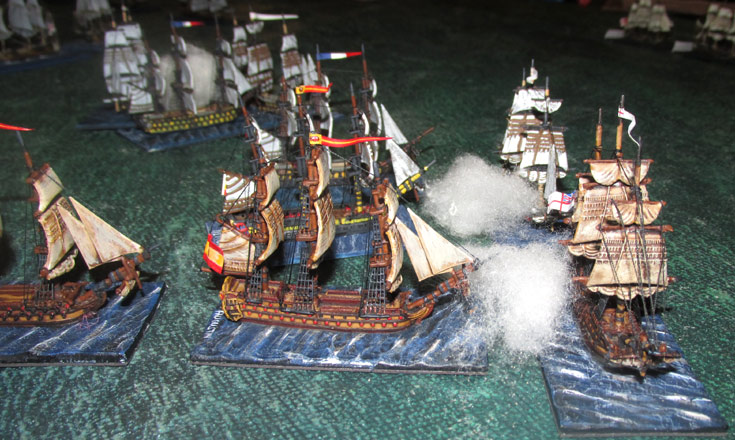
In honour of it being the anniversary of Trafalgar, we decided to refight the battle. We hired a local bowling club for the Sunday, set out our 16×6 foot table, and set to. The flagpole outside was even adorned with the three nations’ naval ensigns for the day – British, French and Spanish – something that rather perplexed the neighbors. The guys in the Edinburgh club have been collecting and building the Trafalgar fleets for a year or so now, and while we’ve had the odd smaller outing, this was the first fully-fledged mass outing. to be honest we were still 15 ships short – half from each side – as one of the guys bought the models, but never did anything with them. So, this was “Trafalgar Light”, or as German Michael said in a rare display of Teutonic wit, it was “A Half Nelson”.  Eleven of us took part, including a few who came in part of the way through, but frankly we couldn’t have handled the full-scale battle – not without more people. Its all fine while you’re heading into the fray, but once the battle degenerates into a melee then a squadron is just about all you can handle. There were four British players, three Spaniards, and the rest were Frenchmen for the day. All in all we had 45 ships on the table – we missed out the frigates and other small vessels. However, it was still jolly impressive, with the British deployed in two long columns, in line astern, lead respectively by Nelson in the Victory, and Collingwood in the Britannia. My own squadron was tail-end charlie of the windward or right-hand column, far behind Collingwood’s flagship. That’s why they only got into action in the last turn or so!
  Just as it did in the real battle the approach was slow and laborious, but looked terrific. Victory was the first British ship into action, getting pounded by the Allied ships ahead of her. However, rather than cutting the line as Nelson did, Nelson (played by “JP”) turned his line parallel to the Allied one, and began blazing back. Clearly JP is more of a traditionalist than Nelson was. Fortunately the French and Spanish formation had become pretty ragged, while the British were still in a neat line, so they had a slight edge when it came to ships able to fight. Meanwhile the second British column reached the enemy line, although Britannia took a bit of a pounding in the process. This time Collingwood (played by Donald) cut the Allied line neatly in two, firing as he passed. The Spanish ships to starboard were thrown into confusion, and soon both sides were firing broadsides at each other at point-blank range.
  Back on the other side of the table Jack Glanville in the Royal Sovereign pulled out of the British line, to cut off part of the enemy fleet. He collided with the ship in front of him when he pulled out, but survived the collision, and soon the French and Spanish fleets were chopped up into three parts. John, leading the French vanguard spent most of the game turning his squadron around and trying to get back into the action. however, the battle was to be decided in what was now two separate melees, where the British had managed a concentration of force on their opponents.
 In the windward column Donald was now well and truly stuck in, firing guns at both sides, raking, and boarding in the smoke. The first scrap saw a Spanish 74 get boarded and captured – the first loss of the day – after Campbell tried ramming his opponent, only to get tangled up with two British ships. Meanwhile Michael’s squadron worked its way around the back of the trapped Spaniards, while my squadron set off to relieve the now hard-pressed Victory. One after another the Spanish and French ships facing Donald and Michael surrendered – much to the chagrin of their commanders – Campbell and Chris.
  Over on the far side of the table the Victory was surrounded by Frenchmen, and was raked from both bow and stern, and then boarded. Fortunately Captain Hardy and the lads fought them off, and JP must have taken four strike tests, thanks to damage and casualties, but passed every one. His French opponent Sandy received a little consolation when he finally forced the British 74 Orion to strike – the only British loss of the day. My own squadron finally came into action late in the day, screening the battered Victory, and pumping close-range broadsides into the French.
  By then though, the French and Spanish were losing ships every turn. Red dots kept appearing – denoting a struck ship. The final tally when we packed up at 5pm was one British ship lost, to four French and five Spanish ones. The final tally; The British Neptune captured the Spanish Neptuno and San Augustine, the Britannia captured the French Neptune, Spartiate captured the French Scipion, Victory captured the Principe de Asturias and San Leandro, Defence captured the San Juan Nepomunceno, while Conqueror took the French Redoutable. So, with eight Allied ships lost, the game was an emphatic win for the British. Sure, it was no Trafalgar, and the loss of Orion took some of the glory out of it, but it wasn’t a bad tally for a first attempt at a large massed fleet action.
  Above all we all had great fun – everyone thoroughly enjoyed themselves – even the Spanish players – and we vowed to run the game again next year, only with all the ships that fought in the real battle, and with more players. The rules from the Two Fat Lardies stable worked a treat, and above all it looked terrific.
The guy who “bought the models, but never did anything with them” actually provided ten of the models that were used on the day. He’s not finished them all yet, but he has started.