
The Battle of Thatcham, 1644
19th July 2018, 10 Comments
English Civil War, For King & Parliament, 28mm
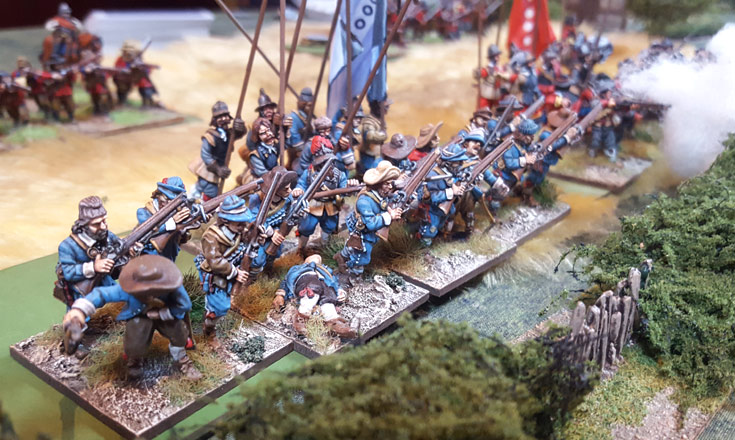
This week we returned to the English Civil War, and a small game set during the Second Newbury campaign of 1644. A Royalist force under Lord Astley was deployed to the east of Newbury, blocking the path of the Earl of Manchester’s Eastern Association, who was trying top join forces with the army of the Earl of Essex. We kept the battlefield fairly open, with just a few hedged or walled enclosures, and a few scattered buildings. It was set just to the east of Newbury, just west of the nearby village of Thatcham. We used a 6×8 foot table. The Royalists were played by Ken and Bart, using Ken’s toys. Their objective was to keep Manchester’s troops at bay until the end of the day. Meanwhile I took command of the Parliamentarian infantry centre, Alistair had the left – a mixed bag of cavalry, dragoons and foot, while Peter had command of our right wing cavalry. We outnumbered the royalists slightly – six foot regiments to five, and six cavalry units to five. We each had a regiment of dragoons, while I also had a small gun battery. So, let battle commence.
 The Royalists stayed on the defensive, with three regiments of foot drawn up behind a hedge, with their cavalry guarding their open left flank. Over to the right the flank was held by two more regiments of foot and a unit of dragoons. Us Parliamentarians advanced right from the start, and while I began pressing towards the defended hedge, Alistair sent Col. Fleetwood’s small two regiment cavalry brigade racing forward, supported by Lillburne’s dragoons (below).
 Over on our right Peter (playing the part of Cromwell) advanced towards Bart’s Royalist horse, and Bart (as Lord Goring) reciprocated. Soon the two sides were locked in a swirling cavalry melee, with first one side losing a unit, then the other. I couldn’t really see what was happening, but after looking away for five minutes it seemed that both sides had punched through their opponent, and were pursuing them off the table edge.
 Two of the four Royalist cavalry units had broken, along with oneParliamentarian one. It was now a question if the victorious units would chase their broken opponents off the table, or rein in and stay in the game. The surviving Royalist horse – two units of the Prince of Wale’s regiment went haring towards the Parliamentarian table edge, but reined in just short of it.
  However, Manchester’s Parliamentarian horse chased its Royalist counterparts off the table, and so was lost. Cromwell damaged to rein in the two units of his own regiment, so the cavalry were now both occupying the starting positions of their opponents, with two units each. Both commanders though, had very different plans for their surviving horsemen.
  Meanwhile over in the centre I was taking a lot of fire from the Royalist brigade behind the hedge. Most of Crawford’s brigade were now disordered by this fire, so I pulled them back and sent in two fresh regiments – Hobart’s and Manchester’s. A few lucky card draws later and it was the Royalist defenders who were looking shaky. Also, thanks to Alistair’s outflanking manoeuvre, the defenders of Col. Astley’s tercio had no reserves to whistle up.
  This advance by Alistair had forced Ken to refuse his flank with two regiments, who were charged frontally by Fleetwood’s cavalry. The cavalry bounced – Col. Vermuyden’s regiment breaking in the process. Still, he had a couple of foot regiments handy, and these poured fire into the Royalist flank. Soon Sir George Listle’s Royalist regiment broke ad ran, leaving Blackwell’s out on a limb. they pulled back behind the hedge, at right angles to the main Royalist front line. Alistair moved his two regiments forward, and pinned them there with one, while shooting up the flank of the main Royalist line with the other.
  So, the Royalists were in a bit of a pickle. Their front line brigade of three regiments of foot was still holding its ground, but it was starting to suffer disordering hits from Manchester’s Parliamentarian foot. That’s when it all started to unravel. First, a unit of Cromwell’s cavalry turned to its side and charged Apsley’s red-coated regiment on the left of the Royalist line (above). That didn’t achieve anything, other than scare an already disordered Royalist regiment. Then though, the greeencoats of Sir John Paulet’s regiment broke after taking heavy fire from two Parliamentarian regiments on the far side of the hedge.
  That forced a morale test on the regiments on either side, and while the hard-pressed men of Apsley’s red-coated regiment stood (above), Sir William Courtney’s bluecoats on their right broke and ran. That then, punched a huge hole in the Royalist line. at that point Ken pointed out that Cromwell’s charge wasn’t possible for some reason or other, which was fair enough. That still left him with one regiment of foot, facing a sea of Parliamentarians.
  Things were happening though, over on the Royalist left. Bart’s two cavalry units of the Prince of Wales’ regiment had rallied and one now tried to charge the flank of the Parliamentarian foot. In the nick of time Peter managed to swing Russell’s regiment round to block its path, and while the foot were disordered, the crisis was averted (above). That left Bart (or Lord Goring) with one stymied cavalry unit, and a small unit of Royalist dragoons, facing off a Parliamentarian foot regiment, and a cavalry unit facing the wrong way.
 The rest of Cromwell’s cavalry were pestering the Royalist infantry, so for the moment they were out of the game. By now though, it was pretty clear that the Royalists were doomed. Another round of musketry saw Sir Allen Apsley’s redcoats break and run, which meant that of his five regiments of Royalist foot, Ken only had Blackwell’s left in the game. It also meant he was out of tokens – having to surrender some every time a unit was lost. He’s lost 16 now, to our 7.
 In what turned out to be the final turn though, the Royalists had one last hurrah. Having rallied after pursuing part of Manchester’s horse off the table, the second unit of the Prince of Wales’ regiment couldn’t resist overrunning the Parliamentarian gun battery. It was easy pickings, and brought the final victory token tally up to 16 and 8. It was a nice consolation prize. So, that was it – another victory for Parliament’s Eastern Association. It was a good little game, and we’re now getting pretty au fait with the rules. I just hope my all-conquering Eastern Association (below) can keep up its run of wins.
Great report, nice looking armies! Always enjoy your stuff.
Thanks Joe. Yeah, sorry it took so long to post – I’m a week behind.. but work has been getting in the way.
What a terrific looking game and account! Your regiments look great, and colouring the chits is a nice touch.
Thanks Simon. My Royalist opponent still has his on sabots, but I took the basing plunge, and apart from my dragoons, my army is now on big single bases. I get about 30 foot on a 19x8cm base, which seems to look the part. Yes, painting the markers was two evenings well spent. It really makes a huge difference, and they’re quite dramatic in colour.
Great looking game! I might have to rebase my foot and cav. Arty on same sized base? Some of my units are too big even for a 200mm grid but if I use your method it would be MUCH easier all around
Hi Sandy. I got my bases from Mike at Supreme Littleness Designs.
I haven’t done one for guns, as I just use two arty bases, but the foot are on 190x80mm, with rounded corners and slightly wavy edges, and the cavalry on 190x55mm (so six can fit into a 4l really useful box)…
Great plan. I use those boxes also. My arty bases are currently too deep so will rebase to 190 x 55 for ease. Thanks!
I’m eventually going to do dismounted dragoons, forlorn hope and guns on a 120mm wide base, so I might not even rebase my guns, which are on 60 wide and 80mm deep bases anyway. The smaller units for dragoons and forlorn hope sort of looks right. I might do my mounted dragoons (currently all my dragoons are still on sabots) on a base that’s narrower and deeper than my proper cavalry, but I haven’t got that far yet. Fortunately Mike at Supreme Littleness is pretty good at putting up with strange demands!
I am just going to standardize the base size and terrain it out piously and in accordance with Protestant, Catholic, Anglican, and Presbyterian requirements for the forces so they are happy!
Great looking game, a stirring narrative, and I too like the colored markers!