
The Battle of Mehr, 1758
10th January 2019, 6 Comments
The Seven Years War, Seven Years, 28mm
This week we returned to High Germany, and a refight of the Battle of Mehr (1758). This was a small but strategically important scrap between the Western Allies and the French. That June, Ferdinand of Brunswick moved his army onto the western side of the Rhine, and defeated the French at the Battle of Krefeld. The trouble was, his line of communications depended on a single bridge across the Rhine at Rees. The French figured that out too, and duly sent a small army led by the Marquis de Chevert to capture it. The bridge was defended by a small Allied force commanded by General Imhoff, who led his troops to block the French advance near the town of Mehr. So, battle was joined. The real thing was a clear Allied victory. With our refight, would history repeat itself? Our layout was based on this map from Charles Grant’s Wargaming in History, vol. 11, which included the background of the battle, and an account of a refight. Well, we simply looted Charles’ map, and refought the battle using our own toys.
 “German” Michael provided the Hessians, while I supplied the rest. The French team consisted of Alisdair, Bart and Angus, while “Old but New” Michael and “German” Michael commanded the Allies. The game was played out on an 8×6 foot table, laid out roughly as in Charles’ book. In the map above the French are shown in blue (11 battalions and a cavalry regiment, a light gun battery and a squadron of mounted “legion”, while the Allies are in red (7 battalions and a cavalry regiment split in two).
  This though, had a couple of little extras. The ranks of the French force had been topped up with militia, so before the battle we rolled for these units, with a 1-2 on a D6 meaning no change, 3-4 a drop of a ,morale level, and 5-6 a drop in morale, and also in fighting ability. Then there was an “X” on the map. This denotes the location of a “covered way”, or hidden approach to the French flank. The idea was, unit A (a Hanovarian battalion) could march around the copse, and appear unexpectedly on the French left flank. That, at any rate, was the idea. In fact it was the French who pulled that trick, rather than the Allies.
  As club tradition demands, we gave Bart the cavalry (a dragoon regiment), and the grenadier reserve (units 2 and 3), as well as the two battalions of Brancas regiment (13 & 14). I took the French right, while Alisdair commanded the left – four battalions of the Swiss and Germans (units 6-9). Bart decided to head over to the left flank, and pass through the little lane by the copse into the open ground beyond. That seemed sensible, as the rest of the battlefield was covered in boggy ground and hedges – hardly good cavalry country. On the French side “German” Michael took the left, and “Old but New” Michael the right.
 The first thing Bart did was move his De Roy dragoons into the lane (above), therefore stymieing any Allied plan to do the same. The rest of the French reserve followed on, led by two battalions of grenadiers. In the centre and left, the French line advanced through the hedges and bog, to get to grips with the waiting enemy. The Allies were waiting for them, and the advance slowed and then halted as a brisk firefight developed. Over on my right my battery of two light guns popped away, but without scoring any hits.
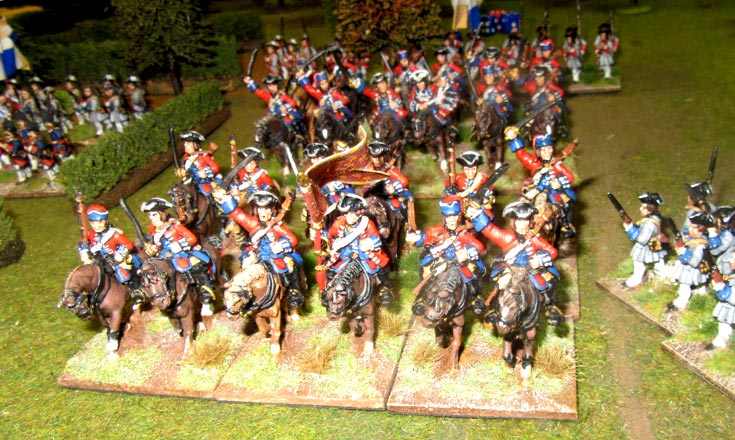
 The Allies countered Bart’s move by concentrating the two detachment of their own Breidenbach dragoons (H1 & H2) into one regiment. They also swung the Hanovarian Stolzenberg infantry (A) round to block the advance of the French dragoons. In fact it was the Allies who won the race to dominate the open ground, as they tried to charge their French counterparts before they could fully deploy at the back of the coppice. The charge got bounced though, and the French dragoons were able to deploy in the open heath.
  So, we were set up for a cavalry battle, to see who would dominate the ground on the Allied right flank. Meanwhile the firefight was coming on apace, with the Hanovarians and Hessians pouring fire into the French. The French held their ground though, helped by numbers. They had six battalions in the centre to the Allied four. On the French right another French battalion (12) stood in the bog, facing off the Hessian grenadiers (G), while on the Allied right a second battalion (B) moved off to face the French outflankers.
  This was where things started to get interesting. Unit for unit the Allies were of a higher quality, but numbers counted. So, despite pushing some of the French back, the attackers had enough of a reserve to fill the gap, or rotate their disordered or shaken units to the rear. The outnumbered Allies didn’t have that luxury. So, over the next few turns the Allies started to take casualties, and slowly fall back. This though, was a slow, gruelling firefight, with the odd charge mixed in. The real fight was over on the Allied right.
  There the French dragoons charged, got bounced back, and charged in again. The two cavalry forces were well matched, but the Allies had the advantage of some infantry support. This helped them in the melee, so even when the French dragoons forced their Hanovarian opponents back, their advance was thwarted by those two battalions of Allied infantry. What broke this impasse though, was the arrival of the French grenadiers at the edge of the coppice. That meant that both units had infantry supports now.
 The Du Roy dragoons were charging in mob-handed, while the Briedenbach dragoons opted for a more elegant deployment, in two units, each of two squadrons. This meant that the French had weight of numbers, but the Allies could recover better between each round of charges. The pressure was on though, and bit by bit the Hanovarian dragoons got shoved back towards their table edge.
  Over in the centre the same thing was happening. The French pressure was mounting, and the Allies were being remorselessly driven back. My guns still did nothing – I think they scored one “disordering” hit in the whole game – but the French infantry did the business, driving back their more professional German counterparts, and slowly advancing across the battlefield. We French had momentum.
  On the far right the battle was something of a damp squib – my infantry battalion got stuck in the bog, and the Hessian grenadiers arrived in time to prop up the Allied firing line, just when it was about to crumble. Elsewhere though, the two sides kept firing at each other, and the French kept rolling forward. By now most of the Allied infantry battalions were either “disordered” or “shaken”. We play a lot of Black Powder, and Michael’s use of those two terms to reflect steps of lost cohesion took some getting used to. By the end of the battle though, everyone was pretty much experienced in the nuances of the rules, and the need to rally shot up troops.
 The cavalry battle was going well too. Actually, it was more a fight between clumps of infantry and dragoons, with both sides using foot to support their horse. Once again though, the Allies were being pushed back, and although Bart never achieved the glorious charge to victory he craved, he had the satisfaction of pushing the enemy back, and adding to the equally slow-paced success of the French infantry. That’s where we stopped the game due to time. The French hadn’t quite broken through, but they were close to it, and everything was gradually going their way. Another turn or so and they’d probably have done it. In any case, after our refight, poor old Frederick of Brunswick’s bridge was looking pretty vulnerable. The rules by the way, are a playtest version, but are coming along quite nicely. There’s still a lot of tweaking to be done, but the basics are there, and they work quite well for the period.
Great stuff! Glad to see the rules are coming along! Mind if I lift this battle and try it out with our group using Die Kriegskunst?
Please do Mark,and let me know how it turned out.
Thank you for an other great wargame AAR, Angus.
Not long now until Kenilworth, looking forward to catching up.
Happy gaming,
Will Harley.
I’m not going to Kenilworth this year Will, as I’ve just moved house. Next year though…
That will mean the hotel has over stocked its gin deposits Angus.
Does that mean I am the only ex matlot again.
Will Harley.
Nice looking game!
Any news on when the second edition of your SYW rules will be available?
I have the first edition, but being a Rules Junkie I’m looking forward to the later version.
Cheers
Keith