
The Battle of Maida, 1806
13th April 2017, 5 Comments
The Napoleonic Wars, Over the Hills, 28mm
Last week’s Napoleonic game wasn’t enough for everyone. So, we decided to stage another Napoleonic bash this week. Bill offered to organise it, and he sensibly came up with the idea of refighting the Battle of Maida, fought in the toe of Italy in 1806. The battle was a fairly straightforward encounter between two under-strength divisional-sized forces, so this made it almost ideal for a club night game.The British under General Stewart were advancing up from the coast, while the French under General Reynier were camped near Maida. The two sides knew the enemy were close, and so they went to a nice open part of the countryside to deploy for battle. This is where the refight began, with both sides marching into contact. The game was fought on a 6×4 foot table. I supplied the British, and Bill brought along the French.  In fact the two sides were approaching each other in echelon, so the French left made contact with the British right before anyone else. As the two sides marched onto the battlefield the fighting spread northwards as each side deployed their troops to battle, and formed up on the northern flank of the units that got there before them. On the south side of the table was the small River Lamato – little more than a trickling brook among the rocks, but it was shaded by scrub and trees – perfect terrain for the detached skirmishers of both sides. So, as the main battle unfolded, the British lights and the French voltigeurs played their own little game of sniping at each other from the undergrowth.
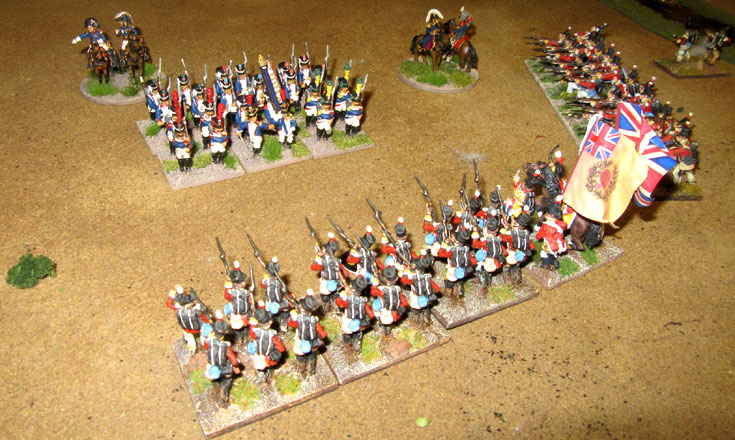
 In the main battle the first units into action were the 1st Leger and the 42nd Ligne on the French side, and the combined light infantry battalion for the British, supported on their left by the 78th Highlanders. Purists will say that the uniform of the highlanders wasn’t right – and the damned pedants would be correct. I didn’t have any suitable Napoleonic Highlanders, so I pressed my 71st Highlanders from the American War of Independence into service. With equal invention my gun battery’s usual 9-pounders were replaced by 4-pounders from my Indian Mutiny collection. Bill though, had all the right stuff for the French, including a battalion of Swiss, another of Poles, and a regiment of chasseurs-a-cheval.
  Effectively, both sides deployed their brigades marching onto the table with one on each side arriving each turn, from Turn 3 on. When my brigade under Col. Cole arrived it brought my guns with them, and these began a long-range peppering of the Poles. When they moved out of arc the guns turned on the French cavalry. The French guns proved less effective, largely because the French decided they needed to attack, and so they spent a lot of time masked by their own advancing troops. Both sides had pretty much got all of their kit onto the table – eight battalions for the British, plus a skirmish detachment and a battery of guns, against nine battalions for the French, supported by skirmishers guns and that cavalry regiment. Once everyone was in place the French made their move.
  They began with an advance to contact on their left flank – Campbell’s command. The 1st Legere and the 42nd Ligne formed into assault columns, and steamed forward, heading for the British Lights and the 78th, commanded with cool aplomb by Peter. By then though, two things had happened. First the detached French voltigeurs had got the worst of their fight with their British counterparts on the riverbank, and had broken. That left the British skirmishers free to pepper the flanks of the French columns, from the relative safety of the wooded riverbank.
 Then, the British opened up with some pretty effective musketry. So, by the time the French actually launched their charge they had suffered a few losses (or fatigue hits). In both cases the British then fired close-range volleys, and countercharged. The fire of the British lights was devastatingly effective, and the 1st Leger was pretty much routed straight away when the counter-charge stormed into the shaken French column. On their left though the Highlanders weren’t quite so good at shooting, and the melee there was a hard-fought affair that went on for three rounds. in the end though, the French broke and ran. That pretty much followed the events of the historical battle. However, the fight was far from over.
  The fight on that British right and French left as the French supporting battalions joined the fray. For another round of melees the outcome of the battle hung in the balance, but the collapse of the 2nd battalion of the 1st Legere allowed the British to creep round the flank of the 42nd Ligne, and pour a heavy flanking fire into them. this was enough to force the hard-pressed French to break and run. In theory the British were supported by the two battalions of Col. Oswald’s Brigade. However, just as they began to join the fight they were charged by the French chasseurs-a-cheval. The 58th Foot managed to form an emergency square in time, and the frustrated french riders milled around for a bit, then pulled back, taking more hits from the British guns as they went.
  Over on the French right Bill’s command were also having problems getting their attack under way. Harassing fire from Col. Ross’ 20th Foot kept them at bay until the British were able to form a pretty formidable firing line. What with mounting French casualties, and with the debacle unfolding on the French left, the French commander decided not to launch another attack. So, that’s where the game petered out.
 In the centre Bart’s four battalions of Swiss and Polish troops were still in the game, and could in theory have done something. So could Bill’s pinned French units over on the right. However, by now the French were outnumbered, and their column assaults hadn’t proved a great success. So, Bill as General Reynier made the sensible decision to keep the remains of his force intact, to fight another day. All in all it was a great little game, and I think everyone enjoyed themselves. The rules worked nicely, and we all agreed that we’d have a go at Maida again, albeit when we have a bit more time on our hands, so we can fight it through to the bitter end. The outcome though, wasn’t in any real doubt when we ended the game, and so it formally ended in a pretty emphatic British victory.
Angus great AAR seems like your still enthused with OTH rules
Peter
Peter, I think they’re pretty good, and have an edge over Black Powder – their main rival. In fact I tend to prefer slightly more complex NApoleonic rules such as “General de Brigade”, but I can’t persuade my fellow gamers from sharing my enthusiasm for them…
Angus gave you seen or gotten a copy of General D’Armee by Dave Brien just out from two fat lardies
I’d be so interested in your opinions
Perer
Peter,
I’ve just picked up a copy. I’ve heard good things about them though, especially about the order system and the charge mechanisms. I’ll peruse and perhaps we can try them out soon.
Ok I will keep an eye on your blog to see battles and AAR’s using both rules Angus
Peter