
The Battle of Faulquemont, 1870
14th September 2017, 2 Comments
Bismarck’s Wars, Bonnie Blue Flag, 10mm
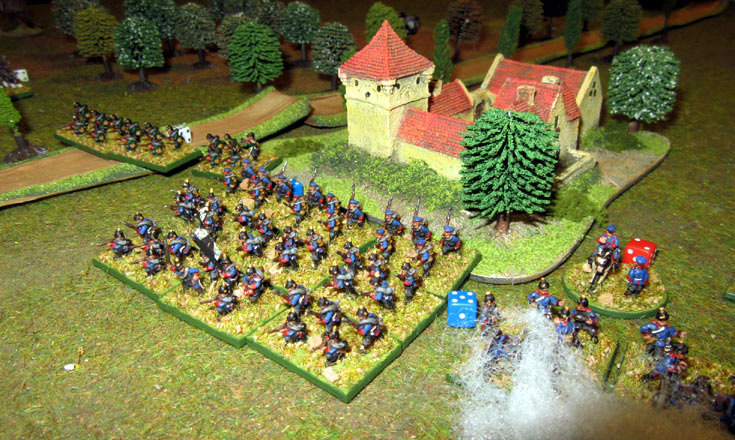
With a lot of people on holiday this week my regular group was reduced to just one – German Michael (aka “Mad Micha”). We opted for a small Franco-Prussian game using our 10mm toys, to see how they work with Bonnie Blue Flag. While Michael hadn’t tried these rules before, I’d played quite a few games with them, before they were published, or even had a name. Strangely, while they’re an ACW set, I’ve never used them for that period – only for Napoleonics and the Indian Mutiny. I was sure they’d work though, as their mechanisms are both sound and simple. The only change we did to them was to change inches for centimetres. In this small game Michael took charge of the Prussians, while I reluctantly took the French. We had a Corps of two divisions a side, which meant the Prussians – with their bigger regiments and lots of guns – had the edge in numbers. However, they were attacking, so in theory that sort of evened out. This fictional scrap was set at the time of the retreat to Metz, with the Prussian III Corps advancing up a road heading west, around the back of the fortress city. At the village of Faulquemont (or Fiesingen) General Ladmirault’s IV Corps barred the way.
 Both sides were deployed with a division on either side of the main road, which ran down the centre of the 6×4 foot table. The Prussians deployed a foot onto the table, massing their Corps artillery on their far right flank. The French artillery reserve though – what there was of it – was still just that – limbered up on the main road at the back of the village. Michael played the part of the Prussian General von Alvensleben, while I took charge of Ladmirault’s troops.
 The game began with a lot of moving – at least on the Prussian side of the table. As he wasn’t in range yet I stayed put. We were using the rules “as is”, which meant thy were really designed for a different war entirely. However, the aim of the game was for Michael to try out the rules system, so we avoided any tinkering, apart from the switch down from inches to centimetres. Actually, movement was a bit of a faff at first, as you had to roll a die for each unit – infantry got 6 cm., plus 1xD6 cm. In future we might let people roll by brigade, at least until they get into rifle range.
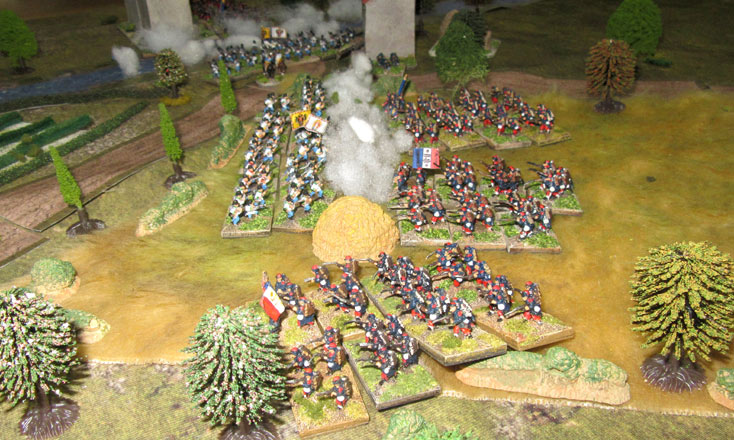
  Eventually, Michael reached the halfway point of the table – then stopped. His infantry were still bunched up in assault columns, but his guns were now in range (48cm) while mine weren’t (40 cm). So, he unlimbered and started blazing away. One of the fun quirks of Bonnie Blue Flag is that you don’t roll to cause damage – the defender rolls to avoid it. So, for instance, if the factor after modifiers was 35, then you rolled a pair of decimal dice, and if you got that score or higher you were OK. Otherwise bad things happened, usually a loss of attrition points, and sometimes that and a fall back move.
  The way attrition points work is simple. Each unit had a dice behind it, colour-coded depending on whether it was Veteran or Experienced. We had no raw troops in this battle. Veteran units start with 6 attrition points, and experienced ones start with 5. As you lose points the total goes down, until you reach 0, when you’re broken. Each divisional or Corps commander has 4 extra points, and he can ride up and hand some over to the battered unit, to keep it in the fight. Simple but effective. Anyway, after two turns of bombardment I found a couple of my units were losing points faster than I liked.
  On my right, the best unit in Grenier’s Division was forced back into the cover of a nearby wood, while on my left my guns were systematically shot up by the Prussian artillery. I tried manhandling them forward into range, but I lost two batteries before they even finished moving up. One of them was my reserve artillery – or half of it – pounded to matchwood while still limbered on the main road, as it trotted out of the village. This pounding just kept going until Cissey’s Division on my right lost all its guns. Only then did the Prussians resume their advance.
  At that point I enjoyed a little bit of light relief. On the far right of Grenier’s Division the 5th Chasseurs began firing at a unit of Buddenbrock’s 6th Division, causing a couple of attrition points. They pulled back through their supports, who started taking casualties in their turn. Other Prussians stopped their guns from firing at my Chasseurs, who took casualties themselves, but seemed to lead a charmed life. In the end they eviscerated the 35th Brandenburg Fusiliers, and broke them. Croix de Guerres all round for that one!
  This though, slowed but didn’t stop the Prussian advance. On the right Stuelpnagel’s 5th Divison was spearheaded by the Leib Grenadiers, with their snazzy white ostrich plumes. On the right the Prussian corps and divisional guns kept hammering away, stopping me from doing anything but hanging on. Still, my remaining battery from my Corps reserve pounded away at the ostriches, while the 20th Chasseurs did the same. inevitably though, I lost a unit – the 6th Infantry Regiment – from enemy fire. Actually, I was amazed that on that flank I managed to hang on until the end of the night. Hang on they did though – despite losses the cautious Prussian advance meant that the French were still defending the outskirts of Faulquemont when the game ended.
  Over on the French left things got a little more heated. Buddenbrock’s Brandenburgers launched an all-out attack, and the 24th Brandenburgers charged my chasseurs. Amazingly the Frenchmen held on, then disengaged. Then they and the supporting unit of zouaves (standing in for the 43rd Regiment de Pied) poured fire into the Prussians, who recoiled. Alvensleben had even brought up his corps cavalry reserve, and I was bringing up mine. We were shaping up for a real hum-dinger of a fight, but we called a halt there, as the evening was drawing on, and it was almost time to pack up.
  So, by the end of the game the French had weathered the Prussian assault, and still held the line to the east of Falquemont. This defence came at a cost though, with almost all the French casualties coming from the Prussian artillery fire. For some reason Michael kept attacking in large assault columns, three bases wide and three deep. That made them juicy targets, so most of his casualties came from French rifle fire. Mind you, there was an optional rule about bigger units being able to soak up more punishment, but while we planned to use it as the Prussian had 9 stand regiments to the French 6 stand ones .. we forgot all about it until it was too late.
  That brings us to the rules. We both thoroughly enjoyed the game, and Michael, who’s hard to please when it comes to rules, gave Bonnie Blue Flag a five star rating. We’d used Fire & Fury before, and we both think this gave a more enjoyable game. Still, there’s a lot of tweaking to do. First off, we need to limit Prussian artillery a bit. In this game they blazed away throughout the game, but Kevin Calder – who wrote the rules – has run games when they have a limited stock, with more available in supply caissons.That’s what we’ll do next time, to make more of a game of it. We’ll also insert a “going prone” rule, which would save the French from taking such a pounding, and of course we need to properly work out what the respective ranges should be for the rifles and artillery pieces of both sides.
  Other tweaks include a sensible one to account for the larger Prussian units, and some way of giving the Prussians more command points- probably by adding a staff officer to each corps, or giving them more attrition points to spend. Also, at the start of each game turn both sides roll for initiative. We might consider letting the Prussians win ties, to reflect their higher degree of “get up and go”. Anything else such as some sort of French command paralysis could be layered on through special scenario rules. This though is all a matter of tweaking. The main thing is the rules worked splendidly, and are well on their way to becoming our rules of choice for this period.
 ![]()


I fully second that.
What would be absolute perfect, would be some amends and tweaks that allow the French and the Prussians to adjust and work with their specific conditions (introducing some sort of flexibility), for example that the French command can shift their focus, creating lethargic front lines (as a matter of speaking) to be able to concentrate and shift other flanks into pro-activeness. …
Nice piece of rules.
Sorry I missed this. Yes you need to think about some FPW specific modifications. Better Prussian command, Prussian bigger units and French lethargy.
Must get the rules.