
The Battle of Driffield, 1644
21st June 2018, 10 Comments
The English Civil War, For King & Parliament, 28mm
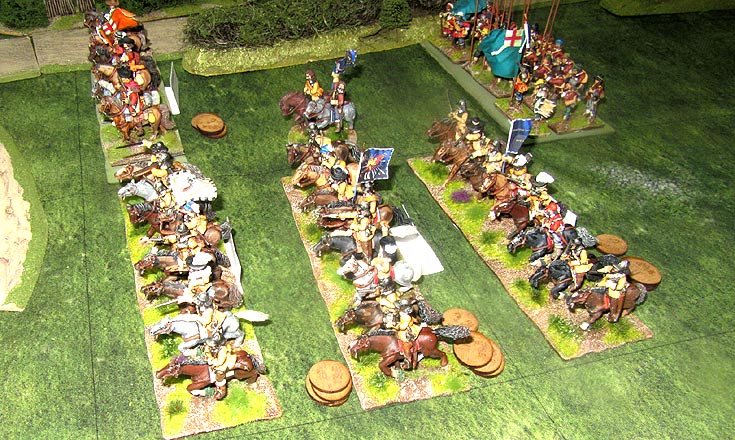
Everyone enjoyed these new rules when we played them last, so we decided to play them again. Ken and I both produced a matched pair of armies – six regiments of foot, six of horse, a dragoon regiment and a battery of guns. While my Parliamentarians were from the Eastern Association, commanded by the Earl of Manchester, Ken’s Royalists represented the Marquis of Newcastle’s army. This battle was a late-afternoon clash between the two forces, just to the north of the little town of Driffield in the East Riding of Yorkshire. The terrain was fairly level countryside, interspersed with lanes and hedges. The outskirts of Driffield lay just behind the Royalist lines, which was deployed facing south. That’s them on the right of the picture above. The Parliamentarians had advanced northwards from Hull and Beverley, and started the game facing the Royalists, a few hundred yards to the south of them. In between ran a small tributary of the River Hull – nothing more than a stream, crossed by the Beverley road, and again to the west by the Middleton Road, which crossed the stream by way of a small bridge. Just beyond it to the west was Sunderlandwick – an area of hedges and enclosures.
 The game was played out on an 8×6 foot table, marked out with a 20cm (8″) grid. We deployed two squares in, with Bart and I running the Eastern Association, and Ken and Peter taking command of the Royalist Northern Army. The game began with a fairly ineffectually long-range artillery bombardment, and then the Parliamentarians moved forward. On the left Bart had a brigade of three infantry regiments commanded by Gen. Crawford, supported by Col. Fleetwood with three regiments of cavalry, and Col. Lilburne’s dragoons. They headed across the table towards the Sunderlandwick enclosures, where Peter was busy deploying his similarly-sized force.
  On my side the Manchester himself led our remaining three battalia of foot forward, while on the right Gen. Cromwell advanced a little more slowly in support. In fact he pulled two aces in a row, which stopped his command from moving at all for a bit. My infantry plodded forward though, and were soon at the edge of the stream. Strangely Ken’s deployment was a little lop-sided, with his infantry brigade of three foot tercios (Langdale’s, Byron’s and Slingsby’s) led by Newcastle himself facing Cromwell’s horse on the Royalist left, while the Royalist centre was held by Lord Goring’s horse (Lucas’s brigade, plus Col. Tuke’s regiment – which were cuirassiers for the day).
  Over on our left, Bart was up to the line of enclosures, and a real pell-mell fight began, with infantry, cavalry and Lilburne’s dragoons (now dismounted) all trying to get at the enemy through the shrubbery. First blood went to Bart when Fleetwood’s horse routed one of Sir Richard Dacre’s cavalry regiments, but the fighting was bloody all along the line, and neither side seemed to be making much headway.
  In the centre Ken decided to charge one of Sir Charles Lucas’ regiments at Manchester’s foot (below), who not only managed to repulse them, but the Royalist horse were dispersed by close-range volleys of musketry. Now, each army started with 16 victory coins in their jar. Each cavalry unit lost meant two are surrendered to the enemy, and three if an infantry unit goes. So, at this stage we’d lost none, while the Royalists were four coins down.
 Next, Ken charged Manchester’s now disordered foot with his cuirassiers of Tuke’s horse. The foot held, but only just, and when the cuirassiers pulled back over the stream I withdrew the battered regiment, and brought Hobart’s foot forward in its place. Fully recovered from their disorder, the cuirassiers went in again, led by Lord Goring. Once more they were bounced, and withdrew back over the stream to recover. I rashly decided to push my foot forward across the stream and towards the Royalist dragoons who were peppering ineffectually away at me.
  That turned out to be a pretty bad move. I got onto the hill, but was promptly charged in the flank by the dismounted dragoons, and from the front by the cuirassiers. Hobart’s battalia broke and ran, garnering the Royalists three victory coins. Any gloating though, was short lived, when volleys from another of my regiments – Montagu’s – saw off the other half of Dacre’s Royalist horse. So, Ken handed over two more tokens, having now lost half his cavalry.
  Over on our far right Cromwell’s horse weren’t even in the fight – all they’d achieved was to attract the ineffectual long-range fire of Newcastle’s foot regiments facing them. So, I moved part of Cromwell’s two-unit cavalry regiment forward, led by Cromwell himself (below). They splashed over the stream at the ford and trotted up the Beverley road towards Driffield. That was pretty much where they stopped too, as they then started pulling more aces, meaning they couldn’t advance any further.
  By then it was getting dark, and the fighting dribbled away to nothing. On the Royalist right, Peter (playing the part of Sir Francis Mackworth) had done a great job of holding the line, but his regiments were now in pretty poor shape. Bart’s infantry (led by Gen. Crawford) weren’t much better, but Fleetwood’s cavalry had broken into the enclosures, and were now posing a serious threat to the Royalist flank.
  On my part of the table Manchester’s foot had pretty much seen off the enemy cavalry, for the loss of a foot regiment of their own, and Newcastle’s force was now clearly “on the ropes”. That’s where we ended it, using the excuse that darkness had ended the battle. All in all it was a great little game. Peter summed it up nicely, when he said that it was a good sign when you enjoyed the game immensely, even if you lost. You can’t get much more of a recommendation for FK&P than that.
Very cool. Nice to see TtS move into another era. Nice armies too!
The rules make the transition very well. They make for a highly enjoyable game.
Nice pics
Thanks. Standard club terrain. We need more hedges though… we had to use a fair bit of bocage for this, so the next task is to find smaller ones.
That’s a cracking looking game! Love the regiments and the terrain. OK to post a link on TMP?
It’s a work in progress, Simon. All but two of my foot regiments are still on sabots. Since the game I’ve been painting counters – well worth the effort.
Please share with whomever you want.
A good looking game, and excellent account. For future reference, your foot might have got away with it if you had remembered that dismounted Dragoons can only charge Forlorn Hopes or other dismounted Dragoons! 😀😀 Page 41, prohibited charges.
Thanks for that Andrew. The game though, worked really well.
You know, some day I should really sit down and read the rules!
Hi saw this article on the battle of Driffield
I just wanted to know where the information came from regarding the battle of Driffield as most of the
Local history books say it was a small skirmish and not a large battle
It was a fictitious battle, Simon.