
The Battle of Catawba, 1781
14th June 2018, 3 Comments
The American War of Independence, Black Powder, 28mm
This week we revisited the American War of Independence – a period we hadn’t played for quite a while. The scenario was concocted by Michael, and was loosely based on a mash-up of Cowpens, Hobkirk’s Hill and Guilford Courthouse. The British were attacking, with eight foot battalions, one cavalry unit, two guns and two skirmish units. For their part the Americans were defending in three lines, with the best quality troops at the back. We played the game out on an 8 x 6 foot table.  Bart and I split the British force between us, with Bart taking Tarleton and his British Legion cavalry, a Light Infantry Battalion, and a detachment of jaegers. He also controlled Lord Rawdon’s brigade – the 23rd and 33rd Foot, the Guards and a guns. I led Webster’s brigade (two battalions of the 71st Highlanders, the von Bose regiment of Hessians, and another gun). On their left was O’Hara’s flank command, with a grenadier battalion, and a light infantry detachment. Our rather unusual objective was that by the end of the game we had to have more units on the enemy’s side of the table than they did.
  Michael, Alisdair and Dougie commanded the first, second and third American lines respectively. They had nine battalions to oppose us (three of which were militia), a couple of units of rifle-armed skirmishers, a unit of continental dragoons and three guns. Michael played the part of Col. Pickens commanding the militia, Alisdair was Col. Howard with the regulars in the second line, and Dougie was Gen. Morgan, commanding the reserves of the third line.
  As the Americans had slightly more troops, the plan was to hit them hard and fast. So, right from the start we advanced as fast as we could, with Bart sending his cavalry and light infantry through the woods on our right flanks, and sending Rawdon’s brigade straight up the hill towards the waiting line of American militia. For my part I sent O’Hara towards the woods on my left flank, then swung Webster’s brigade towards the American militia unit hunkering behind a stone wall at the top of the hill. In between the two militia units was a small wood, held by American riflemen. So, to deal with them, I extended a battalion of highlanders into open order, and charged into the wood.
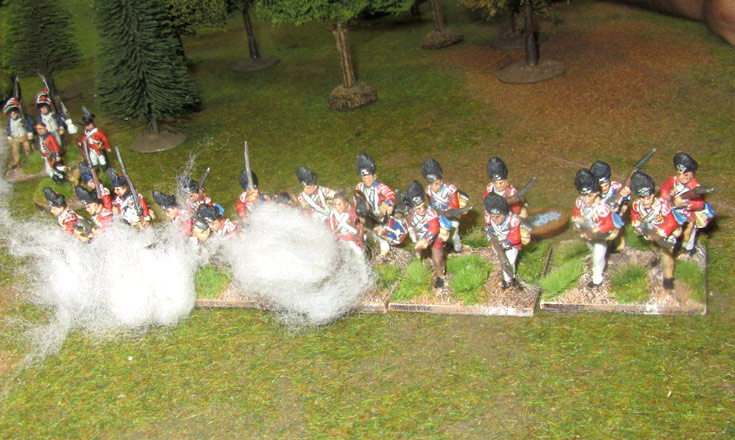
  Actually, it all worked surprisingly well. My grenadiers and the 23rd were disordered by American fire, but the rest charged home, and drove the rebels back. The riflemen in the woods evaded, and pretty soon we emerged onto the plateau of the hill. A second bayonet charge saw the rebel militia break – first the Virginians facing me, and then the North Carolineans in front of Bart. The hill was ours. However, this was only the first American line – there were two more of them in front of us, and those troops were mostly continental regulars.
  That’s when we lost our first unit. The American guns could now shoot us up, and their fire led to a battalion of 71st Highlanders taking and failing a break test. So, they got lifted off the table. Quite a few of our units were now either disordered or had taken hits, and the Legion cavalry were still struggling through the woods on our right flank. So, we needed a turn or two to sort ourselves out.
 That, of course, is when I hit on the bright idea to charge the remaining battalion of highlanders into the American ranks. One of their units was shaken, and I thought we might be able to break it and get a foothold on the far side of the stone wall before the Americans could react. it sort of worked. Despite being disordered as we went in we hit the Americans hard, and broke their unit. That though,l put the highlanders in an awfully exposed position.
 First off, an American gun on their right turned and started firing canister into their flank. Then a unit of crack continental regulars advanced on them, as well as a unit of continental dragoons. However, once again it was the artillery fire that did the trick for the Americans, and the second unit of highlanders were lifted from the table.
  This little drama though bought us the time we needed to consolidate. The Americans were now facing Lord Rawdon’s brigade on the right, which was advancing on the stone wall, supported by the British Legion cavalry and a battalion of light infantry on their far right. On my side of the table the grenadiers were standing firm, backed up by the von Bose Hessian regiment.
  We did a quick unit count, and we saw we’d actually done it – we’d fulfilled our victory conditions. So, all we had to do was to hold on for another turn or two, and not lose another unit. that of course, was the tricky part. Fortunately the high-rolling American guns seemed to go through a bad patch, and for the next two turns they didn’t cause hit. Our guns did a little better, disordering a continental unit and forcing it to retire, while Bart’s 23rd Foot did the same to another American unit facing them.
  So, when it came time to call the game it was a British victory. However, it was a pretty hard-fought contest, and a difficult scenario for the British. the American defence in depth plan worked pretty well, and we were definitely running out of steam by the time we reached the second line. So, a good game, and one that could have gone either way.
Thank you an other beautiful looking wargame and a wonderful selection of figures.
Happy gaming,
Will.
Nice looking and seemingly quite well balanced game. I do have a question though 🙂
We play Black Powder rules too (for ACW) and I thought when a unit gets a Disorder result it cannot advance period. You lose your action for the turn, though you can fire with a Disordered modifier. But not charge the enemy.
Unless you guys maybe use some house rules. God knows Black Powder needs some!
Yes disorder means you can’t advance. You have to wait for the disorder to come off before they can roll forward again.