
The Battle of Brandywine, 1777
20th October 2011, 0 Comments
The American War of Independence, Black Powder, 28mm
This game is a scaled-down version of the British flank attack at the Battle of Brandywine (11th September 1777). When General Howe found himself facing Washington’s Rebel army at Brandywine Creek, he left half his force to pin the enemy to the front, then marched the other half of the army to the north and east, to hit them in the flank. This flanking force led by General Cornwallis appeared in front of Birmingham Meeting House, and our game picks up there, around 4pm, with Cornwallis trying to smash the hastily-formed American line before Washington could rush reinforcements to the battlefield. Essentially I scaled the real forces down by about half, to give a flavour of the battle, but without making me need more lead than I actually had. The Americans deployed on either side of the meeting house, which should have sat on a crossroads, but I didn’t have enough road sections in my toy box. Over on the American left flank was a ford over Brandywine Creek, where Cornwallis’ reserve brigade was expected to come on halfway through the battle. The Americans were reinforced by troops coming up the road from the south, near the meeting house. Cornwallis’ flanking force was made up of top grade troops – a brigade of light infantry, a brigade of grenadiers, and the brigade of Foot Guards. It doesn’t get much better than that. The Americans were generally rated “Line” or “2nd Line”, which gave the British a big edge in troop quality. They’d need it, as they were attacking uphill against a more numerous enemy.
 The British began with a general advance – Cornwallis leading the light brigade on the left, Brigadier Matthews leading the guards in the centre, and Brigadier Meadows taking command of the grenadiers on the right. They weren’t as pretty as they should have been – the guards left their flags back home in London, while as “converged” battalions the other units didn’t carry any colours. Anyway, the Americans opened up with artillery, and with their skirmishers. The advance continued, and casualties were light apart from in the centre brigade, where the guards were suffering from the undivided attention of the rebel guns.
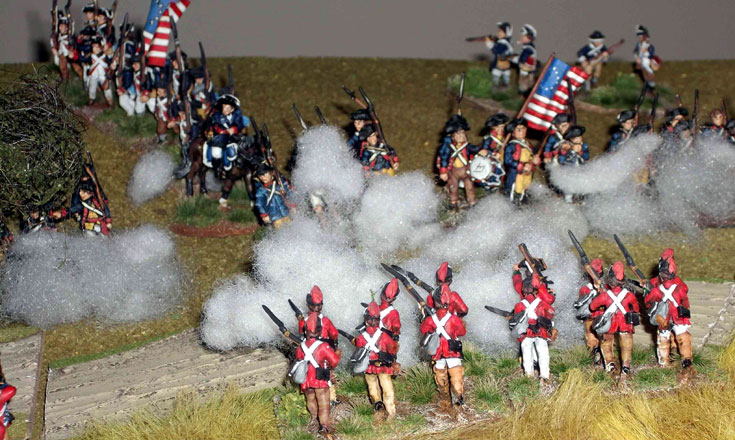
 Eventually the British drove in the American skirmish screen, then on the right the light infantry stood, fired a volley and went in with the bayonet. That didn’t work so well – one of the two light battalions was repulsed, while the other refused to charge home, and just stood shooting at the enemy. Fortunately Cornwallis was on hand to rally off any “disruption points”, and he sent his attached unit of light dragoons in a move around the American right flank. The second charge worked better – while the 2nd battalion was repulsed again, the 1st battalion of lights charged home, just as the dragoons caught the defenders in the flank. Not unsurprisingly, the American unit broke and ran.
 Over on the British right the grenadiers did the same – fired a volley and then charged home. They were up against two Maryland regiments of Col. Stone’s brigade, but while one unit held, the other was pushed back. At that moment the British reinforcements appeared, led by a battalion of Hessians. The Germans fired into the flank of the Marylanders, and when the Americans pulled back they and the other reinforcing battalion – a British one – crossed Painter’s Ford to join in the fight.
 It was only in the centre that the Americans were doing well. The advance of the guards was stalled by excessive “disruption points”, and Brigadier Matthews spent most of the game trying to rally them off, and to spur his brigade forward. All that happened was that one battalion retired, leaving the other standing disordered in front of the American line. It wasn’t a performance they’d boast about in the Cavalry and Guards Club…
 Back on the American right the defenders managed to shore up their line with the help of a regiment of reinforcements. These troops – Virginians eventually managed to form a line, and Cornwallis decided not to charge it again. In fact he couldn’t – his units were “blown”, so the lights re-deployed in skirmish order, and spent the rest of the game blazing away at the American line, until it was forced to retire from the table. This retreat wasn’t their fault – it was the result of a general American morale failure, following the collapse of the American centre.
 Having cleared away the Marylanders, the British on the American left powered forward, and charged the American defences in their left flank. After over-running the guns, and forcing poor General Sullivan to flee the battlefield, the Americans had to undergo an Army Morale Test. They failed it miserably, hence the general withdrawal off the table. The game was therefore a British victory, won thanks to the quality of their troops, and some lucky die rolling at the crucial moment. In terms of the Battle of Brandywine, Washington would have been on the ropes after this – just as in the real battle he’d have to use troops from his left to reinforce his collapsing right flank somewhere to the south of the meeting house. Cornwallis was on a roll, and there was a good chance he’d be able to mop up these American brigades piecemeal as they appeared. In the real battle, stripping the American left gave General Knyphausen the opportunity to storm across Chad’s Ford, and deliver the killing blow.
 The game therefore worked out pretty much like the real thing, but of course the real test would be to have all the lead available to refight Brandywine as one humungous battle. One day…
Back on the American right the def