
Skirmish at Harelaw, 1592
16th May 2019, 10 Comments
The Age of Mary Stuart, The Pikeman’s Lament, 28mm
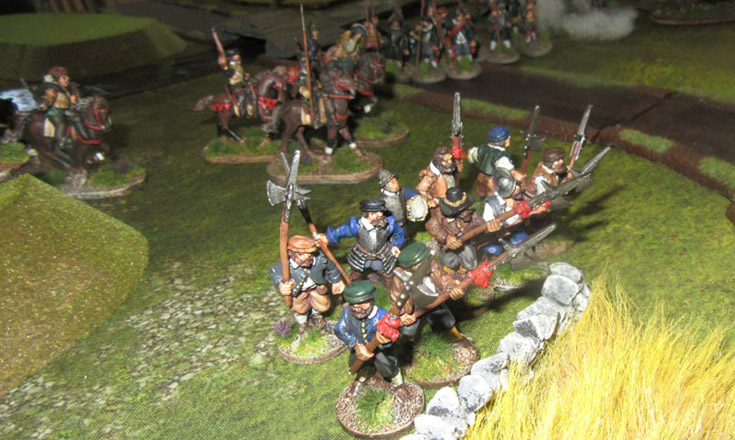
First of all, sorry for not updating this website for a while. the thing is, I’ve moved house, and life got in the way. Mind you, I only missed one week’s game, but I haven’t had a chance to update the site – until now. I’ll “backfill” some of the missed games over the next week or so. Also, I’m no longer in Edinburgh, so the name of the site is now a little misleading. I’m in Orkney, and so this game was played in the Orkney Wargames Club, not the Edinburgh one. This week there were just two of us – Sean and I. A third gamer, Joe, joined us for a bit, but only to watch, as he had to leave early. So, we wanted a small game, and so a Border Reivers fight fitted the bill nicely.  The premise was, the Bells had been raiding up north, and were on their way home across the border. To reach the safety of North Cumberland they had to cross the Liddle Water just south of the little hamlet of Harelaw, a few miles upstream of Gretna Green in the West Marches. Out to stop them were the victims of the raid, their bitter rivals the Grahams. The road south (now the B6318) ran through Harelaw, and on to the small wooden bridge spanning the Liddel. The game was played on a 6×4 foot table, with the Bells appearing on the northern small edge, and the Grahams on the eastern and western sides.
  The Bells had five units of mounted Reivers – all six figures strong – but we left out the rustled cattle that should have accompanied them, mainly ’cause I couldn’t find them in time for the game. The Grahams had a unit of 12 shot and another of 12 pikes coming on from the western long edge, within 2′ of the Liddel Water, plus two units of 6 mounted Reivers and 12 halbardiers from the eastern edge. I ran them, while Joe ran the ones coming from the west, until he had to leave. So, that meant five units a side. Sean – a Bell himself – came on down the road, but sent two units around the eastern side of the village.
  Essentially it became a race for the bridge. Joe headed towards it from the west with the Langholm militia (the pike and shot), and eventually he won the race. Sean rolled a lot of bad activation rolls at this stage, so progress was a bit slow. Anyway, my own forces weren’t much better, but by the time the Bells had passed through Harelaw my halbardiers (the Newcastleton militia) had reached the enclosure to the south-east of the village, and took up position there behind a stone wall. My two units of mounted Reivers – both Grahams – hung about on a small hill to the east of the bridge. That meant the onus was on Sean to fight his way through.
  He decided that charging pikes frontally wasn’t a good idea. Instead he relied on caracole tactics – advancing a little then shooting from horseback with pistols when within 6″ of the enemy. It worked pretty well too. Being unable to reply, the pikemen began to take casualties, while the supporting shot of the Langholm militia missed a couple of chances to shoot when they failed their activation rolls. Eventually though, they found their mojo, and the caracolers were driven back, having taken three casualties. by then though, Sean had brought the rest of the Bells up. He now had enough horsemen to launch an all-out drive for the bridge.
  Of course, things weren’t going to be that easy. First, with the stats we’d concocted for the Reivers, they were good at defending themselves (a 4-6 on a D6), but not so good at attacking (needing a 5-6). So, Sean wanted to whittle the defenders down a bit first using pistol fire. Then, over the next couple of crucial turns, he failed his activation rolls – he needed a 7+ on 2D6 to activate for a caracole – and the grand assault sort of fizzled out. However, he got a charge in against the now wavering pikemen, who were only saved by some poor melee dice. The bells pulled back, buying time for me to move the halbardiers forward to plug the route to the bridge. That though, left them pretty exposed.
  So, Sean softened them up with caracoling from his cavalry to the east of Harelaw, and then charged them by riding down the main road. It worked – half the halbardiers were wiped out – but the Bells took casualties too, and weren’t able to force a decent hole in the defenders’ line. I sent in my own Graham reivers to protect the halbardiers as they pulled back, and these fresh mounted reivers were duly shot up by Bell pistols. It turned the tide a bit though, as the other unit caracoled, driving the Bells back a bit. By now Sean’s units were scattered around the table, and all of them had taken casualties. one was down to just one rider, while all but two of the others were down to half strength – just three men. That meant you rolled 6 dice rather than 12 in a melee or shooting attack, which made them a lot less effective. The defenders had taken casualties too though – the Langholm pike and shot had been chewed up a bit, as had the Newcastleton halbardiers and one of my mounted Graham units.
 It was pretty clear though, that by now the Bells had shot their bolt. So, after another turn which didn’t change the overall picture we called it a day. The Bells rode off to find an undefended crossing somewhere else, while the Grahams and their local militia allies licked their wounds, having successfully guarded the bridge. All in all it was a good little game, and it could have gone either way. Sean’s caracole tactics paid off, but he also suffered from the defending shot, and the Grahams exploited this to win a clear defensive victory. However, watch this space. I’m sure the Bells will be back raiding soon, and the Graham cattle will be at the top of their rustling list. First though, I have to find those cattle figures…


Glad your back 🙂
Thanks Martin! It’s good to get all the lead unpacked too!
An other fine looking game Angus, I hope the move went well.
Happy gaming,
Willz Harley.
It did Will, and I love the view from my study window over Scapa Flow. There’s also a nice wee wargaming club up here.
Also glad you are back posting, I was getting worried. Nice little game, our local group enjoys Pikeman’s Lament too.
Pleased to see you’re back. Your reports have been missed.
Splendid to see you back. I have missed your reports. Hope all is well in your new location.
I love Orkney …and there’s a wargames club!
Nice solid Scenario. I used it too for TYW.
The story behind it, the ups and downs of the career of the officers give the the game the flavour we like very much.
Aye, the rules suit this period really well, even though it predates their official time period a wee bit.