
Mersa Brega, Western Desert,1941
5th January 2017, 8 Comments
The Second World War, Battlegroup Panzergrenadier, 10mm
Last week Sandy Gillespie and I discussed the possibility of staging a small WW2 game, as I hadn’t yet tried out the new “deluxe” version of Battlegroup Panzergrenadier. These used to be a staple rules set of ours, but they got set aside as we got caught up in Chain of Command WW2 skirmish games, or other periods entirely. Now, a few of the others overheard us, and said they wanted to play too. So, for the first game of 2017, what began as a small “rules acquaint” became a 12 person mega-game, fought on two tables! The game was set in late March 1942, a few weeks after the British swept the Italians back towards Tripoli. Now the Italians were counter-attacking, encouraged by Rommel and his Afrika Korps. In our game the battle was fought on two 6×4 foot tables, with the attackers entering on the western edge (one of the short sides). On the inland (or southern) table, the British defenders were faced by the spearhead of the German 5th Light Division, with its panzers. On our coastal (or northern) table the defenders of Mersa Brega were facing the Italian Ariete Division, supported by colonial infantry. In both cases the British infantry were drawn from the 9th Bttn., Rifle Brigade. Held in reserve off table were the cruiser tanks of the 5th RTR, and a squadron of Matilda infantry tanks. Both sides had air and artillery support.
 First off, I have to apologise for not taking pictures of the inland table. I did, but thanks to problems with my camera (which is falling apart) none of them were any good. Here though, the two companies of British infantry of the 9th RB at least had anti-tank guns backing them up. On our coastal table where two more companies of the 9th RB were deployed, we had nothing – not even a single anti tank rifle. This with half of the Ariete Division coming down the Via Balbia towards us! So, for us it was all about hanging on until reinforcements arrived.
  On the inland table the Germans pressed forward cautiously, using their tanks to probe the defences. Once the British anti-tank guns were detected (ie when they opened fore) the Germans called down artillery fire in an attempt to neutralise them. The British whistled up their Matilda squadron, which stemmed the tide – for a bit. It was clearly a hard-fought game – what I saw of it – and both sides lost tanks, until the table seemed covered in smoke. The initial infantry positions of “C” Company were forced to pull back under overwhelming pressure, but this was done with some skill, and by the end of the evening the British were still hanging on. However, in two places a handful of German tanks had broken through gaps in the defences, and were heading for the eastern table edge. Victory, you see, depended on getting troops off both eastern table edges.
  On the coastal table a mile or so to the north the leading British company was dug in on castle hill (where an old Moorish castle stood), standing in for cemetery hill in the real battle. The British also held the lower village, at the bottom of the hill. The second company (“B”) was echeloned back at the rear table edge. To the best of my knowledge Jack who commanded them never moved them or fired a shot with them throughout the game, despite the waves of Italians breaking over “A” Company further forward. Words will be spoken in the mess. So, “A” company were left to face some two battalions of Italian infantry, supported by a battalion of Italian medium tanks.
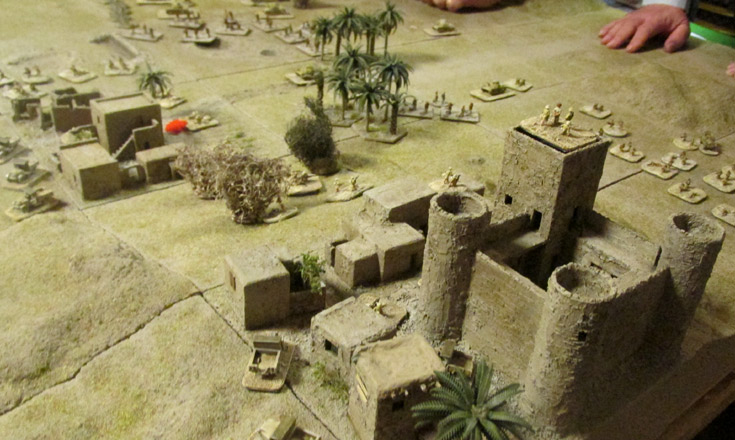
 What Jack and I tried to do was to use our artillery to blunt the attack while the Italians were still bunched up. Unfortunately two of our three “stonks” were completely ineffectual. We never got air support, but reportedly a strafing run by Hurricanes was made over the inland table. So, while two Italian companies massed on the lower slopes of Castle Hill, two more assaulted the lower village, supported by tanks, while a third pair of companies headed around the defender’s left flank.
  Given the odds it was hardly surprising the defenders were forced out of the lower village. The platoon there was suppressed by fire, and then hit by a combined assault of tanks and infantry – colonials from the south and regulars from the west. One section was wiped out, and another forced to retire. At that point the platoon commander pulled everyone back towards the east, hoping to regroup. He never had much of a chance, as the Italian tanks and infantry kept coming – three assaults, one after the other. Another section was lost, but the rest withdrew up onto the hill, where the tanks couldn’t follow because of the rough bouldery ground. They caused casualties though – capturing the lower village had cost the Italians the best part of an infantry company, and a couple of tanks had been damaged and forced back.
  Then there was a development. The cruiser tanks of the 5th RTR appeared, commanded by Jack, and they advanced a little way onto the table. There they stopped – in very non-cavalry fashion – and formed what amounted to a gun line. It then blazed away at the Italian tanks, who duly blazed back – a tank on tank fight that seemed to achieve little, but looked pretty impressive nonetheless. Then though, the Stukas arrived. Attracted by this nice juicy line of British tanks they swept down it, releasing bombs as they went. The pain was concentrated on “B” Squadron, which had four tank models (A10s and A13s). Two were knocked out, and two more damaged and forced to retire. This blew a big hole in the British line, and a company of Italian M13/40’s advanced into it, having bypassed the British defenders of the lower village.
  On the Italian right the colonial infantry crested a small hill and found themselves facing “A” squadron of cruisers. They were duly riddled with machine guns fire, and forced back. That and the Italian tank advance proved to be the attackers’ high water mark. On castle hill the defenders fought off two frenzied assaults by Italian motorised infantry, causing heavy casualties. Somehow they held on, and by the end of the game castle hill remained firmly in British hands.
  At that point we called it a day. Sandy, acting as the umpire, rules interpreter and all-round compere took a look at the situation on both tables, and deemed the game a draw. However, on the inland one he noted the a few German units Germans looked like they’d make it past the defenders, and within a turn or two would make it off the table. So, that table was a draw with a slight German edge to it. All in all it was an enjoyable game, even though at some points the Italian assaults seemed never-ending. I actually think we did well to survive, given the odds. While the inland table was played out on a sand-coloured cloth, what really made the coastal table was the terrain, built by the fair hand of Mike Scott from Supreme Littleness Designs. It was a real joy to game over, and while it all looked terrific, with its coast, hills, roads and villages, the real cherry on to p of the cake was the castle, with the small village clustered around it. Absolutely superb – and thanks again “MDF Mike”, for letting us play with it!
Nice looking table! I’m also doing North Africa in 10mm. May I ask where you procured the buildings (or scratch-built?) and palm trees? Thanks.
The terrain all belonged to Michael Scott, who runs Supreme Littleness Design. He made it all, including all the buildings. I don’t know about the trees though. It certainly looked terrific. Ask him (www.supremelittleness.co.uk).
The palm trees come from one of the Chinese model railway suppliers that can be found on Ebay.
How did Panzergrendier feel after playing Chain of Command? which would be the rules of choice? (if you had to make a choice!) I ask as I seem to spend most of my wargaming time looking for the perfect rules!!!
Both.
CoC is skirmish, BgPzgren. is a company/battalion level game.So, two different kettles of fish. They’re both really good at what they do, but there’s room for two sets here, so no choice required!
Why not try playing them both, and do please let me know what you think of them.
Looked to be a fun game and the Brits did well to hang on as they did. I agree that the terrain is cool and the castle particularly impressive.
Our group used to play Panzergrenadier and it seemed to do the job for Eastern Front 41-42. What is different about the deluxe version may I ask? I don’t really want to pay a bunch of money if there isn’t a lot between the two versions.
We have tried getting into Chain of Command but – maybe we are thick – we just have trouble understanding parts of the rules, especially the activations.
Derek is the one to answer that one – he does rules much better than I do. The two versions are essentially very similar, but Dave Brown has changed around the command system a fair bit, making it a little slicker. He’s also tinkered with artillery and air strikes, and force morale. Derek?
As for CoC, they’re pretty straightforward, especially if you look at the tutorial videos on You Tube.
Command system is different and a few other things are tweaked and cleaned up a bit. I think Deluxe is a better game, there seems to be more important decisions to be made.
I’m going to fork out the £30 odd for the new version.