
De Jager’s Drift, 1899
30th August 2018, 17 Comments
Queen Victoria’s Little Wars, The Men who would be Kings, 28mm
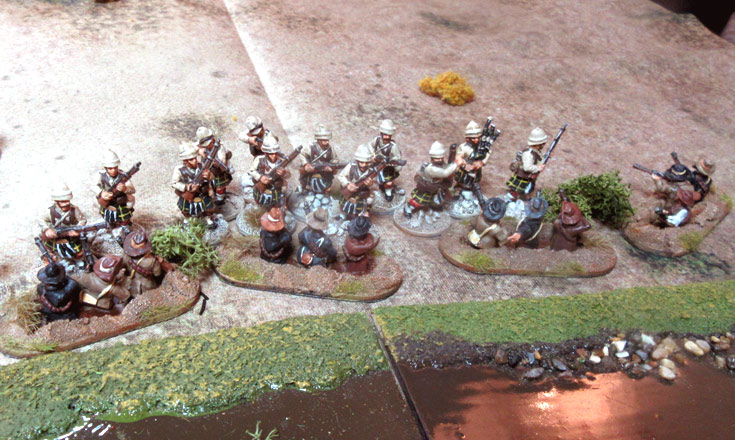
We were off to South Africa this week, for a small three player game set in the Second Boer War. The British objective was to capture De Jager’s Drift (ford), the only place for miles where British guns and wagons could cross the Buffalo River. Obviously the small Boer commando guarding the crossing was out to stop them. Campbell and Mark played the Brits, while “Whizz-Kid” Michael and I took command of the Boers. The game was played out on a 6×4 foot table. Three companies of the Johannesburg Commando were dug in around the ford, two in trenches on the enemy (south) side of the river, one on either side of the ford. The third company was in reserve, protected by a wagon laager on the north side of the ford. On the small hill behind it was a Schneider-Creusot field gun, emplaced in a stone sangar. Each “company” consisted of 12 figures.
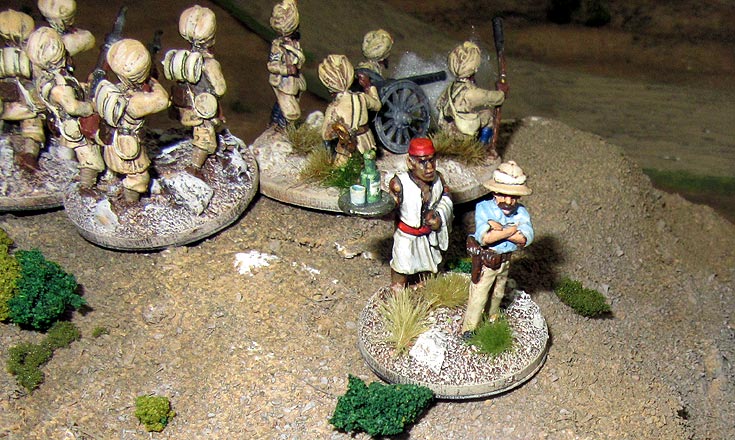
  In front of them was an open veldt, broken only by a dry river bed (or donga), and a small hill. The club really lacks decent-looking sandy hills, so we had to make do with ones which were much too verdant for the South African veldt. Still, needs must. Anyway, the British had four companies of infantry (two from the Gordons, and two from the Dorsets), backed up by a squadron of the 5th Lancers, an artillery section, and a machine gun section. They had a little over a three to two advantage in points over the Boers, but they’d probably need it, as they were attacking an entrenched position across an open plain. The officer with his “gin bearer” (above) and the heliograph team were just there for show.
  The game began with a general British advance, with the Gordons falling in behind the Dorsets. So essentially they were coming on in a column of four companies, one behind the other, each extended in skirmish order. Mark commanded the guns and the Gordons, while Campbell ran the Dorsets and the lancers. Now, this should have made a juicy target for the entrenched Boers.
 However, this was where we hit our first snag. They were classed as “mounted infantry”, and in The Men who would be Kings you have to roll two dice to activate a unit, based on their leader’s rating. All the British activated on a 5+, and the Boers on a 7+. If you fail to activate, you get a free action. For most regular or irregular infantry this is a fire action – troops can always fire. However, for mounted infantry this became a move action instead. Inevitably, for two crucial turns the Boers in the trenches failed their activation rolls, and so their Mauser rifles remained silent.
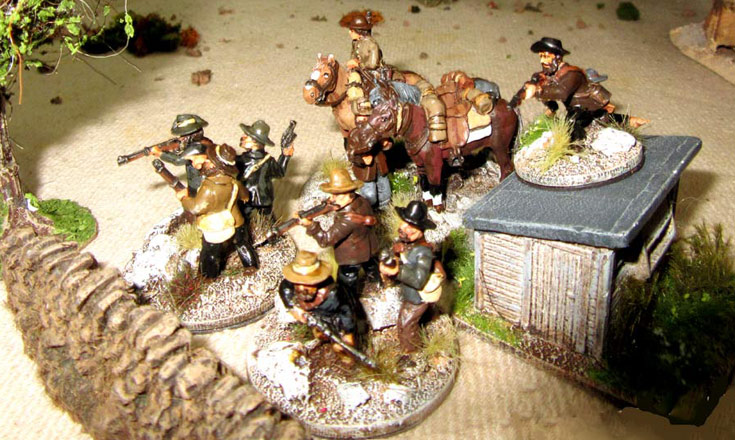
  This wasn’t good. The Boer field gun managed to hit the lead company of the Dorsets, and pin them in place. The second company came round their flank, and then they got pinned too. So, the advance had stalled in the open. Meanwhile, on the British right flank, the lancers were cantering forward, bypassing the trench line to cross the river. They reached the far bank, but that was as far as they got. The Boer reserve company in the wagon laager managed to open fire, and in two turns it managed to wipe out most of the lancers, and drive the rest off. That little success though, was the high point of the Boer defence.
  On the British left the Gordons charged out from behind the Dorsets, urged on by a Staff Sergeant who was so good his unit got a free action. So, it could move at the double, and then charge. They Highlanders slammed into the Boer trench line on the west side of the ford, and captured it at bayonet point. More than half the Boer unit were wiped out, for the loss of one of the highlanders.
  The survivors fled across the river, only to be followed by the highlanders, who managed to catch up with them, and wipe them out. The second company of Dorsets were still pinned, but managed to open fire on the remaining Boer trench line with their rifles. Under cover of this the second company of Highlanders stormed across the ford to the west of the trenches, while the first company of Dorsets launched a bayonet charge. It was all over in a turn. The defenders were chopped up, and the survivors gunned down at close range by the highlanders as they fled from the trench and tried to find their horses.
  Seeing this the final company of Boers in the wagon laager decided to call it a day. They retreated off the table, and so ceded the ford to the British. So, the Dorsets had one trench line, and the Gordons the other. The wagon laager had also been abandoned. That meant that the only Boer defensive position left was the field gun, up on top of the little green hill, ensconced in its sangar.
 With hindsight it might have been better having the Boer trenches on the north bank of the river, but the idea was that both banks were lined with vegetation, which provided light cover, but also blocked line of sight. So, from the south bank the Boers could see over the veldt to the south. From the north bank they could only cover the far side of the river. Actually, the Boer dispositions were fine. The problem lay with their poor activation scores, and their lack of a free fire action. During all this the Boer field gun had been banging away at the British, with mixed results. Its free action was to fire, rather than to move, and so it kept firing, despite Michael’s dire activation rolls. then, as the highlanders advanced towards it, he tried to save the gun by limbering up and clearing off.
 His activation rolls failed him though, and so the same fast-moving Staff Sergeant’s company charged up the hill and took the sangar at bayonet point. That ended the game- a resounding British victory. The British benefited from having a sound plan (using the Dorsets as a screen), and the Boers were handicapped by their ability to fire when they needed to. We may tinker with the free actions rules next time. However, it was a cracking little game, and everyone thoroughly enjoyed themselves. The rules are great fun to play, and are both easy to pick up, yet offer enough of a challenge to make the game interesting.
Angus, outstanding blog sir! I found your blog simply by mistake from a link while reading this game on another blog. It’s been a long time since we’ve seen you here in S. Fl. I shall peruse your blog for more reports, and I’m sure, quality content.
Take care.
Cheers,
JB
Thanks Jeff. Yes, its been a while since I last rolled dice in FL!
Lovely figs and game. I like the modded figs in trenches!!
What makes?
Love the 2nd Boer war. Underated for sure!
Thanks Darren. The guys in trenches are Old Glory, sawn off at the chest.
Thanks Darren.
The guys in trenches are from Old Glory (cheap but effective), snipped off above the waist. Then just mdf base, filler and sand.
Great looking game – not sure that it is right that Boers activate on a 7+? Is there no mechanism for being pinned as this could hamper the British advance to withering Boer fire and superior marksmanship. The Boer firing range should also be better than that of the British.
But what played out above still seems relatively realistic given that Boers generally would take a few pot shots and then bugger off leaving the British to then take up their positions. Victory conditions therefore for Boers could be based on casualty rates inflicted?
The 7+ was the result of a die roll by the Boer player when setting up the forces. We classed them as irregular mounted infantry, so their free action (when they don’t activate is move, rather than fire. To give the Boers their due, they really should be able to do both. We could have upgraded them to “sharpshooters”, but that meant spending more points, and we kinda wanted to get all our toys on the table! Yes, casualties would have made more sense than terrain captured. Next time…
Middag Mnr,
Vind bo genoemde baie interresant.
VRAAG: Waar kom die naam “de-jagers-drift 1899” vandaan, hoekom de Jagers, wat se rol het hulle daar gespeel. Verskoon die Afrikaans.
Geskiedenis Groete.
HENNIE
Vreemd genoeg kom De JAeger uit ‘n soektog na die streek op Google Earth.
It came from a search on Google Earth, Hennie. If I read it wrong them my apologies. I added Drift ’cause it sounded good!
These look good fun. I’m about to do my first foray into using the rules for a 1st Boer war scenario in a multi player game. What activation rules do you use? The book has options but I’m going for cards for individual units rather than one side, then the next. Since it’s meant to be an individual game as well as a team game, this seemed more appropriate.
I agree that Boer being mounted infantry can stop them shooting so I’m looking at offering the Boer player the base irregular cost and the points to either make them sharpshooters or mounted with fieldcraft.
We use the rules straight out of the box. That worked fine for us, but it would be easy to tinker with a different method, like Piquet’s five offs, Lardy cards or Bolt Action dice bags. Do please let me know how it works!
Well my guys enjoyed my 1st game based loosely on bronkhorstspruit. The boers suffered from their poor leadership values but my allocation of Victory Points enabled them to win even though they lost more men. I gave them a chance of finding soft cover bs shooting whenever they used gone to ground. This suited the terrain they were in. The British soon figured out that their martini henries close range was better than the boer sniders which was why their casualties mounted up quicker!
It sounds like you’d thought this through nicely, Dave. I like the idea of the Boats using “gone to ground”, but still able to fire.
It’s a points thing. Irregular infantry start with4pts. Regular with 6. If you upgrade the irregulars per the book to modern firearms and discipline of 1 they cost the same as a regular unit of the same size, but don’t have close order/volley fire and also have an average worse leadership value.
1pt for irregulars getting fieldcraft when cheaper native infantry get it for free also doesn’t seem right to me. That’s why I improved it for the boers
That makes eminent sense, Dave.
My mate Bryan has done a write up for our bronkhorstspruit battle on his website:
https://theuncivilservantblog.wordpress.com/
Thanks for sharing Dave. That looks like a great little game, and I love the look of the teddy bear fur veldt.