
Crossing the Danube, 1809
22nd September 2016, 4 Comments
The Napoleonic Wars, Over the Hills, 28mm
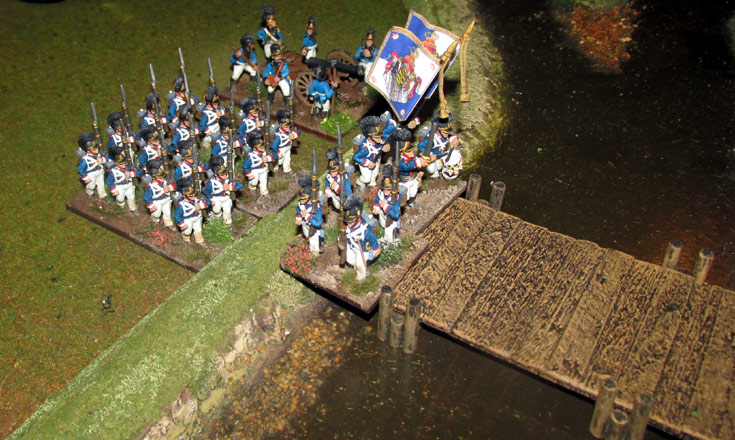
This game – our third using Over the Hills – was based on the tried and tested “Bridgehead Breakout” scenario, found in Charles S. Grant’s Scenarios for Wargamers (1981). Like most of Charles’ his “teasers” the scenario is harder than it looks. We’ve played this particular one a few times now, and we’ve learned that while both sides can win, they really need the luck of the dice, or some sort of major battlefield success to swing the balance. That degree of challenge is what makes most of Charles’ scenarios stand the test of time. In the map above, east is at the top. One force (in this case the Wurttembergers, part of the Vandamme’s VIII Corps of the Grand Armee) are holding a small bridgehead on the southern bank of a river – the Danube. They deploy behind line G-H on the map above. Their aim is to break out of their bridgehead, and take the high ground to the south. The trouble is, the bulk of their army is still on the north bank of the river – they’ll have to cross one of the two pontoon bridges one unit at a time in order to join the battle. They had 12 battalions, 2 cavalry regiments and two gun batteries – a third of which began the game in the bridghead.
  The Austrians, the Advance Guard of Hohenzollern’s III Corps, are deployed to the south of line E-F, and their aim is to sweep the Wurttembergers back over the river. They had ten infantry battalions, two cavalry regiments and two batteries to do the job. While the Wurttembergers had more troops, they also had that river to cross. The objectives were tough. Anything less than capturing the high ground for the Wurttembergers or the bridgehead for the Austrians would result in a drawn game. That meant that in order both sides needed to fight as aggressively as possible. The game, by the way, was set in April 1809, on the banks of the Danube, somewhere between Abensberg and Ratisbon.
  Both sides duly acted aggressively from the start. As the Austrians surged forward (commanded by Bill on the right and me on the left), the Wurttembergers (Bart on their left and Campbell on their right) sent their cavalry forward, to head off the enemy advance. On the Wurttemberg left, Bart sent his light cavalry in a headlong charge which caught Bill’s leading Austrian unit deployed in line. They didn’t have time to form “emergency square”, and their defensive fire was ragged. So, they got ridden down. Bart’s horsemen went on to charge the unit behind them, forcing it back before the cavalry pulled back to reform. So, first blood to the Wurttembergers.
  On my left, the advance was going fairly well, but Campbell’s cavalry switched positons, forcing me to peel off a hussar regiment to do the same. the two clashed, the ground blocked slightly by a battalion of Austrian Grenzers, who had seen the Wurttemberg chevaux-legeres coming, and had time to form square. This time the Austrian hussars were bounced back – largely because Campbell was in line while I was still in column of squadrons. That and bad dice rolling on my part. Still, the square stopped the Wurttemberg horsemen from following up, which in turn bought time for the hussars to reform.
  Over on the Austrian right things were going from bad to worse. Bill charged home in column, leaving one unit in square to block the enemy horsemen. However, staunch defensive fire from the Wurttemberg gun battery and infantry put paid to the assault. In fact, one of Bill’s line battalions was so shredded that it evaporated – it’s “Fatigue Level” had dropped to zero. Still, it was all to play for. While the Wurttemberg reinforcements were beginning to appear over the river, as the bridghead had actually contracted slightly under Austrian pressure, then there was no room for them to deploy. One good charge could tip the balance. So, in the centre Bill had deployed the cream of his Austrian force – three battalions of grenadiers. They advanced, heading towards the centre of the Wurttemberg line, which was held by two units of formed-up jaegers. The charge went home, and this time the Wurttemberg defensive fire was a bit ragged. I also charged in with my remaining unit of hussars. That meant of Campbell’s two Wurttemberg battalions, one was being charged by a battalion of Austrian grenadiers, the other with a grenadier battalion and a regiment of cavalry.
  The hapless jaegers didn’t have time to form square, and were duly ridden down – swept from the field. The other Austrian battalion suffered a little better, and was forced to retire. That though, just added to the logjam inside the bridgehead. My Austrian hussars – the 4th (Hessen-Homburg) – had cleared a space though, and they wheeled to face the flank of the next Austrian battalion, while a battalion of grenzers faced up to them to charge the Wurttemberg foot in the front. The grenzers charged in, supported by the cavalry. This time though, the Wurttembergers held firm, and their assailants pulled back, licking their wounds. Not to be outdone the Wurttemberg infantry rallied and charged home. This time the grenzers broke and ran. The charge would have overrun a battery of Austrian artillery too, had it not been half an inch out of reach.
  Not to be outdone the Hessen-Homburg hussars charged again, this time against a battalion which had just crossed the pontoon bridge. The poor Wurttembergers were in march column, and so were cut to pieces. That, I’m afraid, was where the game ended. We’d had a late start, and so we ran out of time. SO, as neither side had achieved their objectives, the game was declared a draw. A tally of the casualties though – four Austrian units lost and two Wurttemberg ones – showed that in terms of units the Austrians had the worst of it. The Wurttembergers had a firm grip on one half of their bridghead, but on the other side – their right – the Austrians were surging forward, and had cut their way through to the bridge.
 All in all it was a good game. It was slower than we expected though, as its been a few weeks since we last used the rules, and none of us had a chance to re-read them before the game. Still, the game flowed well, and I was impressed how straightforward the shooting and melee mechanisms were. The game had a good flow to it, and for the uninitiated (Bart and Bill) the gist of rules was easy to pick up. Both of them, and particularly Bill, are loyal Black Powder gamers. Still, they kept an open mind, and expressed their willingness to try the rules again, after they’ve given them a read through. For my part I think they’re good, and have a period edge to them that Black Powder lacks. I’ll certainly look forward to our next game.
I’m trying a comments button. Each thread will stay active for a month, so feel free to put in your penny-worth…
Angus, How well do the rules handle fighting in houses? Often the downfall of any rules
I asked Angus that last night and he said they hadn’t really tried out the rules for fighting in built up areas yet.
As Derek says, we have that joy to come…