
Blowing the Beiseforth Bridge 1758
28th December 2017, 8 Comments
The Seven Years War, Die Kriegskunst, 28mm
For our last game of the year we scaled things down a bit, partly because a lot of the regulars were away, but also because this was just a little playtest. I’ve been tinkering with my new version of Die Kriegskunst, and this was a chance to try out some of the changes. For the game itself, i turned to an old favourite – Charles S. Grant’s Scenarios for Wargames (1982), and a teaser called “Reserve Demolition”.It involved Blue Force holding a bridge – in this case over the River Fulda – while sappers prepared it for demolition. Red force were out to stop them, and to capture the bridge intact.  In our game, Blue Force were the Hanovarians, played by Campbell, while Bart (above) took command of Red Force, which was French. I umpired, and scribbled notes about any problems that came up. Fortunately these were few and far between, and so we all got to enjoy what turned out to be a fun little game. I’d scaled the forces down from Charles’ scenario, so the Hanovarians began with three battalions, two cavalry regiments, a gun battery and a jaeger unit on the table. Bart’s French, appearing in two columns, consisted of six infantry battalions, three cavalry regiments, a gun battery and two light infantry units. While I’d scaled this all down, out forces were still roughly in the proportions laid down in Charles’ teaser. The game was played on a 6×4 foot table.
  In the teaser map, Blue Force set up within the bridgehead marked by the X-Y line on the map, or on the far bank of the river – the eastern bank in our case. That meant the Fulda was flowing south, not north as shown above. Red Force could appear in one or two bodies, along one or two of the three roads approaching the bridge from the north, south and west. Of course, being one of Charles’ scenarios nothing was quite straightforward. The French appeared after 1D6 +4 turns, or if they came on in two columns the second one had to be rolled for on subsequent turns, using an “off-table” reserve activation – a system built in to the rules. As for the Hanovarians, their commander knew that it would take roughly 12 turns before the sappers were ready. As the umpire, I secretly rolled to see if they’d finish sooner, later or on time. At the start, the Hanovarian commander – Graf von Hardi – didn’t have orders to blow the bridge- only to prepare it for demolition. As he watched the French approach he had no real idea when that order would come through. Still, his sappers were getting on with the job of preparing the gunpowder charges, just in case.
  The game began properly on turn five, when the leading French infantry brigade appeared on the western road, accompanied by a gun battery and a unit of chasseurs a pied. It deployed with the Irishmen of Dillon’s regiment in the front, while the guns set up shop on a nearby hill. The Irish soon came under fire from the buildings on the west bank of the river, and from the little wood to the south, where Campbell had stationed his Hanovarian jaegers. He had a strong defence, with two battalions in the buildings, and a third in reserve on the bridge. The Hanovarian guns were limbered up, ready to deploy, while Campbell’s small cavalry brigade began on the west bank, on the small hill north of the village.
  Campbell took the fight to the enemy by launching his cavalry in a charge. His target was the French guns, but despite approaching them from an angle his leading unit – the von Briedenbach dragoons – was badly shot up by the guns, and halted. Not to be put off, Campbell whistled up his second unit – the von Reden horse – and launched a charge at the Volontaires de Clermont, whoi just had time to wheel into line before the riders smacked into them. Luckily for Bart his men were still formed up in close order, and even more luckily they survived, thanks to some lucky die rolling. the Hanovarian cavalry retired, while the French light infantry retreated – which pretty much brought that little combat to a swift close.
 That though, left the Hanovarian horse still standing in front of the French guns, Campbell failed to activate his cavalry brigade for two turns in a row, and so von Reden’s horse were dispersed, while the dragoons began to retire from the field. the only thing that really went well for Campbell here was that Bart also failed to bring on his second column – his three unit strong force of cavalry, which was due to appear on the southern road. So, it was up to the French infantry to seize the bridge.
  By now though, the French commander Prince Bartek had got all his infantry on, and was massing for his big assault. the first brigade, with the Irish battalion and two more of the Touraine regiment were squaring up against the village, while to their right the 2nd brigade had now deployed. It was made up of two battalions of the La Conde regiment, and one battalion of the German La Marck regiment, plus a light infantry detachment from the Chasseurs de Fischer.
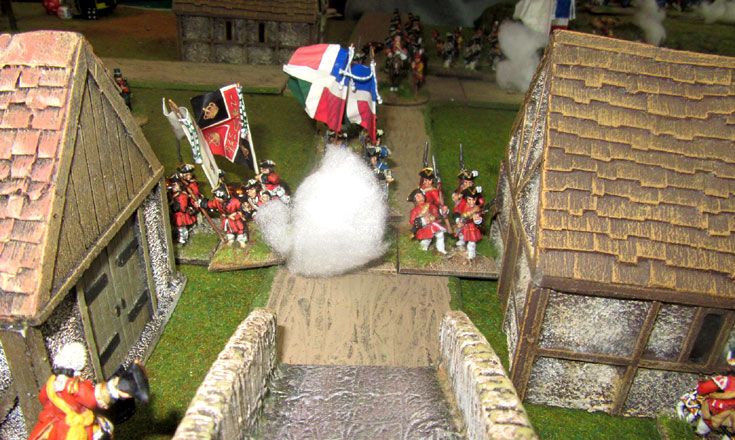
  Their objective was to hit the village from the south, while the 1st Brigade attacked from the west. First though, the 2nd Brigade had to deal with those pesky Hanovarian jaegers in the wood. They were from the Freytag Jaegerkorps, and given the odds they put up a pretty good fight of it. Eventually though, numbers began to tell. The wood was now ringed by French troops, who blazed away into the trees until the jegers dispersed – or more likely came out with their hands up. That just left the final assault on Beiseforth village.By now it was Turn 12, and the Graf von Hardi had just learned that the bridge was ready for demolition. However, good news though that was, it still left him with a problem. He still had two battalions on the wrong side of the river. I was looking forward to the bit where we tested the town-fighting element of the rules, but in the end Campbell spoiled all my fun. As the French massed at the southern end of the village, then advanced, he pulled out von Diepenbroick’s battalion, and ordered them to run back across the bridge to safety. So, all the French could do was to occupy the empty houses.
  On the other side of the road leading to the bridge something similar happened when the Touraine regiment launched its charge. The von Wangeheim battalion sneaked out the back of the buildings, and formed up in march column, facing the bridge. their plan was to run for it and hope for the best. Simultaneously the Irishmen of Dillon’s regiment advanced straight into the village from the west, and actually caught von Diepenbroick’s men as they reached the bridge. The resulting melee saw the Hanovarians forced to retire – which in fact was exactly what Campbell had wanted. the problem of course, was that the Irishmen now held the western nd of the bridge, and were about to storm across it.
  That was when a slightly flustered Graf von Hardi ordered the sappers to blow the bridge. For bridge blowing I turned to Charles Grant’s The Wargame, or rather the amendments to it written by his son Charles S. Grant – the chap who wrote the teaser. In it, the turn after the order is given the player in charge of the sappers rolls a die. It goes up on a 4-6, while a result of 1-3 means either that the charges don’t go off, or there’s some form of delay, or partial demolition. Campbell duly rolled a “6”. BOOM!!!
 So, as the French objective was to capture the bridge intact, they lost. In theory the Hanovarians won, as they were ordered to hold the bridge until ordered to destroy it, which they did. However, Charles had written in a proviso. If Blue force achieves its objective, but leaves 40% of its men on the wrong side of the river, then the game becomes a draw. Looking at the numbers, Campbell manage that, as by now he just had three infantry battalions left, and a gun battery. Only von Wangeheim’s battalion was stranded, which was just 25% of his remaining force. However, before the bridge blew, the Hanovarians had lost two units dispersed (the jaegers and the cavalry), and one unit routed off the table (the dragoons). Despite some heavy casualties, the French force was still completely intact. So, I decided to interpret this as 40% of the original force – and Campbell had lost 57% of his men. So, I declared the game a hard-fought draw, which seemed to please everyone. The rules worked quite smoothly, but we still have a bit of tinkering to do, particularly with the charge and melee rules, with command, and with brigade morale. Still, for a “work in progress”, things are shaping up nicely.
An other excellent AAR and a wonderful selection of fine photo’s of wonderfully painted 18th century figures, inspiring and a big thank you for sharing.
A happy New Year to all of you North of the border from me in deepest Devon.
Happy gaming.
Willz
Thanks, Will.
Lang may yer lum reek, as they say here.
As for the figures, look for your ones … on the casualty spinners… They work a treat.
Great stuff once again. Where do you get your casualty spinners? 1-10? or 1-12?
Happy New Year!
Thanks Mark!
They’re 1-12 ones, and a present from Will Harley, down in Plymouth. He (I think) used old Spencer Smith figures, and spinners from Martin at Warbases. They really look the business, and I wish he’d make me some more! Actually, I’ve had casualty figures and spinners in my lead like for ages, but haven’t got round to making them.
Thanks Angus, I am off to Warbases. They do great stuff.
I picked up a copy of General d’Armee to prep myself on the rules. Do you foresee your play test set coming out in the next couple of months?
Have a great day!
Unlikely … too much work on. It’ll probably be the Spring.
Sorry I missed this – game looks good and it seems it was a well fought plucky action.
I’ve spent a while reading 19th C battles and reading what happened in ACW battles, they were decidedly chaotic.
Union division generals were given an area of the line and any troops being under order to pass through their area came under there command regardless of who had given the movement order.
Very much like a club wargame in the early 1970’s.
50 years earlier Napoleon had the same trouble with Ney at Quatre Bras.
At Blenheim 2 cavalry generals conferred and then without orders sent their cavalry to support Marlborugh’s Attack on Blenheim.
Acting on their initiative.
I’ve not come across anything like this in the SYW but taking the initiative or showing a lack of initiative mus have happened hence the ADC’s n General d’Armee’.
I think more attention in the skills of various commanders should be valued better with SYW than in Napoleonic and Acw Rules.