
The Battle of White Plains, 1776
20th August 2015, Comments Off
The American War of Independence , Black Powder, 28mm
This week we sneaked in an extra Sunday game. The Edinburgh Club meets in the city’s Royal Navy Club, and on weekends the place is usually busy. This week though we were able to put on a game – one organised by Michael Schneider as a foretaste of his forthcoming New Jersey campaign. We refought the Battle of White Plains, the last proper battle of the New York campaign. After he was bundled out of New York and Manhattan, Washington withdrew northwards, and dug in at White Plains, midway between the Hudson River and Long Island Sound. Both sides were evenly matched in numbers, but not in troops quality. The inexperienced rebels were demoralised, and faced by veteran British and Hessian troops. Still, Howe rejected a frontal attack, and instead opted for a left hook. Washington’s left flank was anchored on Chatterton’s Hill, separated from the main rebel army by the Bronx River. today the river is a road, and the hill is covered in houses, but back in late October 1776 the hill was open, surrounded by farmland and small woods. In the real battle the British and Hessians attacked across the river, and drove the rebels off the hill. However, they put up a strong resistance, and were able to retreat in good order to join Washington’s main army. their stand bought time for the rebels to withdraw to the north, and eventually to cross the Hudson to reach the relative safety of the New Jersey shore. Sure, the battle was fairly one-sided. So, in our refight, the American objective was not to defeat the British – they were too heavily outclassed for that – but to hold them up long enough for Washington’s army to make good its escape. Each turn an American unit remained on Chatterton’s Hill another American regiment could make it safely up the road leading north from White Plains. So, the British not only had to defeat the enemy – they had to do it with alacrity.
 Jack Glanville played the part of Major General Spencer, commander of the rebel right flank, while Michael was Major General McDougall, whose strong brigade containing some of Washington’s best regiments was sent to reinforce Spencer. Bart played the part of General von Heister, commanding Howe’s left flank, and the local British commander Major General Leslie a. His task was to pin the rebels on the hill, and to drive them off it supported by a hefty battery of artillery. I played Colonels Rall and von Donop, who led the two Hessian flanking forces. My job was to cut the rebels off from Washington, and to roll up their flanks. At any rate that was the plan. For their part Spencer deployed the bulk of his forces on the hill, while McDougall’s brigade deployed to the south, handily placed to protect Spencer from a flanking attack.
 The battle began with an almighty artillery bombardment. Bart had his secret weapon with him – his “magic” orange dice, which is well known in the club as one that defies all probabilities, and rolls more sixes than anything else. It certainly lived up to its reputation – in three turns half the American troops on the hill had either broken or pulled back, thanks to some pretty incredible shooting. British light infantry followed this up by driving their American light infantry counterparts back from the banks of the Bronx, and then following them across, to establish a foothold on the western bank. For us at least, the battle had got off to a pretty good start.
 Two things happened on turn 3. First, the Americans continued to suffer heavily on Chatterton Hill, but more importantly Rall’s brigade arrived on the southern table edge – three large regiments of Hessian foot. They began advancing northwards towards McDougall’s brigade, which rapidly turned to face this new threat. However, at the same time Leslie’s main infantry force advanced to the banks of the Bronx, and started crossing directly opposite McDougall’s position. Outnumbered, McDougall’s regiments deployed as best they could and began firing at the attackers. In fact it was the hessians who got the best of the firefight, forcing one Connecticut militia regiment back, and forcing another to break. this was the start of what would be a long succession of break tests for poor Michael, whose troops were put under pretty intense pressure.
 Back on the hill the British light infantry and some Hessian jaegers sprinted forward to occupy the rudimentary rebel earthworks. This was too much for General Spencer, who immediately launched a counter-attack. in theory he should have sent the small group of British skirmishers from the hill, but a combination of a good defensive position, excellent troop quality and criminally lucky die rolls meant the British held their ground, and the rebels were sent running. Jack tried again, but the same thing happened. By then the Americans were off the hill, sheltering behind it from the guns, which were sited to sweep the broad flat summit. Victory – in theory – was there for the taking.
 Things were heating up to the south of the hill, where McDougall’s brigade found itself under attack from two sides. My Hessians also enjoyed a small tactical advantage. Thanks to the advance of Leslie’s brigade on their right, they only had part of McDougall’s force to deal with, and for the most part they enjoyed a two to one numerical advantage in units, as the Americans were forced into what appeared to be a giant square. On my left the Hessian Leib regiment was advancing down the road, on the left of my Hessian brigade. Its fire drove back a Connecticut militia regiment and broke it, and then it turned to pour fire into the right flank of another rebel militia unit to the east of the fence-lined road. The two other Hessian regiments fire too, and naturally the unit was eviscerated.
 This pattern was to be repeated for the next few turns, as one by one McDougall’s units were ripped apart by British and Hessian musketry. Spurred on by this success the British 17th light dragoons rode around the American left flank, and crossed the bridge that served Spencer’s link with the rest of Washington’s army. This might have been seen as daring – even dashing – were it not for the arrival of three rebel regiments , who appeared as reinforcements on the western table edge. Their fire disordered the dragoons, and this was followed up by a spirited infantry charge by a New York regiment. The dragoons broke and ran, and the American line of retreat was preserved… for now.
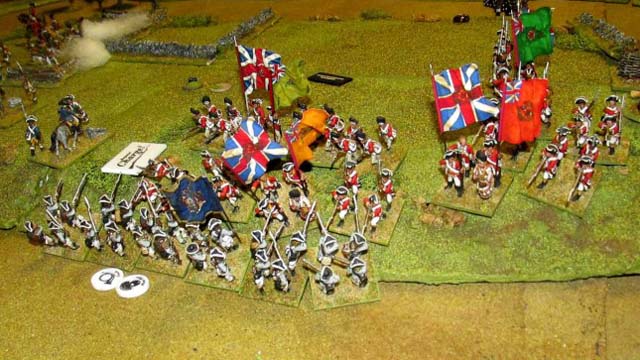
 This “for now” caveat was down to the long overdue arrival of von Donop’s Hessian brigade on the British right flank. Essentially it followed in the path of the hapless dragoons, but their advance was painfully slow. While they plodded on, the battle for the hill was reaching its height. On the hill itself most of Spencer’s units had been broken – only one remained – but with the arrival of these three regiments of reinforcements Spencer’s brigade launched a last-bid effort to buy time by re-occupying the hill. Immediately the British gunners set to work again, breaking one of the four units in a single turn. Another was defeated by the concentrated fire of the British light infantry and their jaeger colleagues – the third American regiment they had seen off that day. Down to the south McDougall’s brigade was in its death throes. One unit facing the British was broken by the concentrated musketry of two British battalions, while the rest of Leslie’s force swept onto and over the hill itself. That’s the situation in the photo above, as they charged down the other side and into what remained of Spencer’s command.
![]() My Leib regiment finally came unstuck – it saw off the final Connecticut regiment, but had to take a break test too, which it failed. it became the second and last British and Hessian casualty of the battle. McDougall himself rode forward to rally Michael’s pet unit – Haslett’s regiment – but a charge by Knyphausen and Rall’s regiments wiped out both the American regiment and its general. On the north side of the table von Donop’s Hessians finally crossed the bridge, and the last two surviving American units were surrounded. That’s where we ended the game – on turn 12. So, a dozen regiments of Washington’s army had got away to safety. In the real battle though, Spencer and McDougall held their ground for as long as they could, and retreated in good order to rejoin Washington. In our game their whole command of 14 units was lost – 12 wiped out, and two captured. British losses were just one Hessian regiment and the light dragoons – a pretty good exchange for the British. Despite their sound drubbing the two American commanders enjoyed themselves, and the game will -apparently – influence the starting strengths and positions in our forthcoming New Jersey campaign. given the victory at White Plains, this can only be a good thing! With luck we’ll have that traitor Washington and his scurvy rebels in the bag before Christmas. What could possibly go wrong?
My Leib regiment finally came unstuck – it saw off the final Connecticut regiment, but had to take a break test too, which it failed. it became the second and last British and Hessian casualty of the battle. McDougall himself rode forward to rally Michael’s pet unit – Haslett’s regiment – but a charge by Knyphausen and Rall’s regiments wiped out both the American regiment and its general. On the north side of the table von Donop’s Hessians finally crossed the bridge, and the last two surviving American units were surrounded. That’s where we ended the game – on turn 12. So, a dozen regiments of Washington’s army had got away to safety. In the real battle though, Spencer and McDougall held their ground for as long as they could, and retreated in good order to rejoin Washington. In our game their whole command of 14 units was lost – 12 wiped out, and two captured. British losses were just one Hessian regiment and the light dragoons – a pretty good exchange for the British. Despite their sound drubbing the two American commanders enjoyed themselves, and the game will -apparently – influence the starting strengths and positions in our forthcoming New Jersey campaign. given the victory at White Plains, this can only be a good thing! With luck we’ll have that traitor Washington and his scurvy rebels in the bag before Christmas. What could possibly go wrong?